getattr, settattr, and compound attributes in Maya dependency graph nodes
28 Jan 2026
The purpose of this post is to give Maya Python developers an example of using getattr and setattr to set class attributes when writing a custom dependency graph plugin. This technique allows programmers to take advantage of Python language features with minimal changes to the standard Maya dependency graph node programming syntax laid out by Autodesk. This post includes:
- An example of syntax that uses
getattrandsetattrinstead of the hardcoded attribute names commonly shown in examples of dependency graph nodes - An example of working with compound attributes
- A node development test loop
- Start-to-finish walkthrough of setting up and testing a node, with completed code
I use this technique in several nodes that are part of my custom animation pipeline. In my pipeline, the node attribute names are defined by an external configuration. Taking advantage of the builtins allows easier implementation of object-oriented programming patterns. For instance, you could pass node classes to a builder method. Finally, using the builtins with a compound attribute allows a low-impact solution to creating attributes with unknown names.
GOAL: I will replicate my animation pipeline’s use case with a simple example node that
- Has a compound attribute with five children attributes
- Has a typed attribute for a user-defined string
- Has a compute function that multiplies together the attributes called out by the user-defined string.

My example node
SET UP: The first step of creating a new node is fussing over the unique hexacimal numeric ID to assign to it. If the node is internal to your organization, you can use any hexadecimal number 0 - 0x7fff. If you intend to distribute your node publicly, you can also request to reserve a block of nodes IDs with Autodesk. I was able to easily reserve a 64 ID block on the Autodesk Developer Network in Novemeber 2024.
For this example, I’ll use 0x00141A44. You can read more about the Maya Node TypeIDs here and review their Python 2.0 API reference here.
When starting a new node, I make a little skeleton with the essential node functions:
from maya.api import OpenMaya as om
maya_useNewAPI = True

class ExampleNode(om.MPxNode):
    id = om.MTypeId(0x00141A44)

    @staticmethod
    def creator():
        return ExampleNode()

    @staticmethod
    def initialize():
        return

    def compute(self, plug, datablock):
        return self

def initializePlugin(mobject):
	mplugin = om.MFnPlugin(mobject)
	try:
		node_name = 'ExampleNode_py'
		node_id = ExampleNode.id
		mplugin.registerNode(node_name, node_id, ExampleNode.creator, ExampleNode.initialize)
	except:
		print("Failed to register node: %s" % node_name)
		raise

def uninitializePlugin(mobject):
	mplugin = om.MFnPlugin(mobject)

	try:
		node_name = 'ExampleNode_py'
		node_id = ExampleNode.id
		mplugin.deregisterNode(node_id)
	except:
		print("Failed to deregister node: %s" % node_name)
I also make a little script to load the node called load.py.
import maya.cmds as cmds
import platform

def load_plugin():
	if platform.system() == 'Windows':
		plugin_path = 'The path to your plugin if you are developing on Windows'
	else:
		plugin_path = 'The path to your plugin if you are developing on Unix'
	cmds.loadPlugin(plugin_path)

load_plugin()
INITIALIZE function: Example initialize functions will generally look something like this:
def initialize():
  n_attr = om.MFnNumericAttribute()
  ExampleNode.output = n_attr.create("output", "out", MFnNumericData::kFloat, 0.0)
  om.MPxNode.addAttribute(ExampleNode.output)
An update to this syntax using the builtins looks like this:
def initialize():
  n_attr = om.MFnNumericAttribute()
  op = n_attr.create("output", "out", MFnNumericData::kFloat, 0.0)
  setattr(ExampleNode,"output",op)
  om.MPxNode.addAttribute(getattr(ExampleNode,"output"),op)
Additionally, note that the attribute names are set as class attributes:
class ExampleNode(om.MPxNode):
    id = om.MTypeId(0x00141A44)
    output = None
    inputs = None
    called_out = None
Here is the initialize function in my final node, written to the specifications laid out in the ‘GOAL’ section:
def initialize():
    # The attribute Function Sets. Operate on the data using the Function Set!
    n_attr = om.MFnNumericAttribute()
    c_attr = om.MFnCompoundAttribute()
    t_attr = om.MFnTypedAttribute()

    # The attribute MObjects. The data itself. Not mine!
    output = n_attr.create('output', 'op', om.MFnNumericData.kFloat, defaultValue=1.0)
    setattr(ExampleNode, "output", output)
    inputs = c_attr.create('inputs', 'ip')
    setattr(ExampleNode, "inputs", inputs)
    value_names = t_attr.create("called_out", "co", om.MFnData.kString)
    setattr(ExampleNode, "called_out", value_names)

    om.MPxNode.addAttribute(getattr(ExampleNode, "output"))
    om.MPxNode.addAttribute(getattr(ExampleNode, "called_out"))

    for k,v in my_dict.items():
        inp = n_attr.create(k, v, om.MFnNumericData.kFloat, defaultValue=0.0)
        # I do not need to use addAttribute on children of compound attributes. addChild is sufficient
        c_attr.addChild(inp)

        # I add all the child attributes to the node class so I can access them in the compute function
        # Not strictly necessary -- could also iterate through compound plug children. But this solution is clean.
        setattr(ExampleNode,k,inp)

    # Notice how I don't add the compound attribute until I add all its children
    # This doesn't matter for the typed attributes and numeric attributes, but for compound attributes
    # called addChild on a compound attribute that has already been added will crash Maya when creating the node
    om.MPxNode.addAttribute(getattr(ExampleNode, "inputs"))

    om.MPxNode.attributeAffects(getattr(ExampleNode, "called_out"), getattr(ExampleNode, "output"))

    # Note how I set the compound attribute as the affecting attribute, not each child
    om.MPxNode.attributeAffects(getattr(ExampleNode, "inputs"), getattr(ExampleNode, "output"))
    return
COMPUTE function: Example compute functions will generally look something like this:
def compute(self, plug, datablock):
    # Recall that the compute function is called on each plug for the node
    if plug == ExampleNode.output:
        called_out = datablock.inputValue(ExampleNode.called_out).asString()
        # DO SOME OPERATIONS TO CALCULATE A VALUE FOR ExampleNode.output, store as a variable called output_value
        out_handle = datablock.outputValue(plug)
        out_handle.setFloat(output_value)
        out_handle.setClean()
    return self
An update to this syntax using the builtins looks like this:
def compute(self, plug, datablock):
    # Recall that the compute function is called on each plug for the node
    if plug == getattr(ExampleNode,"output"):
        called_out = datablock.inputValue(getattr(ExampleNode,"called_out")).asString()
        # DO SOME OPERATIONS TO CALCULATE A VALUE FOR ExampleNode.output, store as a variable called output_value
        out_handle = datablock.outputValue(plug)
        out_handle.setFloat(output_value)
        out_handle.setClean()
    return self
Here is the compute function in my final node, written to the specifications laid out in the ‘GOAL’ section:
def compute(self, plug, datablock):
    if plug == getattr(ExampleNode,"output"):
        # ExampleNode.output is the MObject itself. Not mine! The datablock allows me to access the value
        called_out = datablock.inputValue(getattr(ExampleNode,"calledOut")).asString()
        if called_out == '':
            return self
        called_out_attr_names = called_out.split(',')
        called_out_inputs = [getattr(ExampleNode,an) for an in called_out_attr_names]
        product = 1.0
        for inp in called_out_inputs:
            multiple = datablock.inputValue(inp).asFloat()
            product = product * multiple

        out_handle = datablock.outputValue(plug)
        out_handle.setFloat(product)
        out_handle.setClean()
    return self
FINAL CODE: Here is my completed node, written to the specifications in the ‘GOAL’ section:
from maya.api import OpenMaya as om
maya_useNewAPI = True

my_dict = {
  "attrA":"aa",
  "attrB":"ab",
  "attrC":"ac",
  "attrD":"ad",
  "attrE":"ae"
}

class ExampleNode(om.MPxNode):
    id = om.MTypeId(0x00141A44)
    output = None
    inputs = None
    called_out = None

    @staticmethod
    def creator():
        return ExampleNode()

    @staticmethod
    def initialize():
        # The attribute Function Sets. Operate on the data using the Function Set!
        n_attr = om.MFnNumericAttribute()
        c_attr = om.MFnCompoundAttribute()
        t_attr = om.MFnTypedAttribute()

        # The attribute MObjects. The data itself. Not mine!
        output = n_attr.create('output', 'op', om.MFnNumericData.kFloat, defaultValue=1.0)
        setattr(ExampleNode, "output", output)
        inputs = c_attr.create('inputs', 'ip')
        setattr(ExampleNode, "inputs", inputs)
        value_names = t_attr.create("called_out", "co", om.MFnData.kString)
        setattr(ExampleNode, "called_out", value_names)

        om.MPxNode.addAttribute(getattr(ExampleNode, "output"))
        om.MPxNode.addAttribute(getattr(ExampleNode, "called_out"))

        for k,v in my_dict.items():
            inp = n_attr.create(k, v, om.MFnNumericData.kFloat, defaultValue=0.0)
            # I do not need to use addAttribute on children of compound attributes. addChild is sufficient
            c_attr.addChild(inp)

            # I add all the child attributes to the node class so I can access them in the compute function
            # Not strictly necessary -- could also iterate through compound plug children. But this solution is clean.
            setattr(ExampleNode,k,inp)

        # Notice how I don't add the compound attribute until I add all its children
        # This doesn't matter for the typed attributes and numeric attributes, but for compound attributes
        # called addChild on a compound attribute that has already been added will crash Maya when creating the node
        om.MPxNode.addAttribute(getattr(ExampleNode, "inputs"))

        om.MPxNode.attributeAffects(getattr(ExampleNode, "called_out"), getattr(ExampleNode, "output"))

        # Note how I set the compound attribute as the affecting attribute, not each child
        om.MPxNode.attributeAffects(getattr(ExampleNode, "inputs"), getattr(ExampleNode, "output"))
        return

    def compute(self, plug, datablock):
        if plug == getattr(ExampleNode,"output"):
            # ExampleNode.output is the MObject itself. Not mine! The datablock allows me to access the value
            called_out = datablock.inputValue(getattr(ExampleNode,"called_out")).asString()
            if called_out == '':
                return self
            called_out_attr_names = called_out.split(',')
            called_out_inputs = [getattr(ExampleNode,an) for an in called_out_attr_names]
            product = 1.0
            for inp in called_out_inputs:
                multiple = datablock.inputValue(inp).asFloat()
                product = product * multiple

            out_handle = datablock.outputValue(plug)
            out_handle.setFloat(product)
            out_handle.setClean()
        return self

def initializePlugin(mobject):
    mplugin = om.MFnPlugin(mobject)
    try:
        node_name = 'ExampleNode_py'
        node_id = ExampleNode.id
        mplugin.registerNode(node_name, node_id, ExampleNode.creator, ExampleNode.initialize)
    except:
        print("Failed to register node: %s" % node_name)
        raise

def uninitializePlugin(mobject):
    mplugin = om.MFnPlugin(mobject)

    try:
        node_name = 'ExampleNode_py'
        node_id = ExampleNode.id
        mplugin.deregisterNode(node_id)
    except:
        print("Failed to deregister node: %s" % node_name)
TEST LOOP: Here is a test loop for this node. You can write a script for the test loop. I prefer to test with the UI to get a sense of the artist workflow when using my node.
- (Re)launch Maya.
- You have to do this each time you update the node code
- Run the load.py script. This will load the node.
- Windows > General Editors > Script Editor
- From the Script Editor, File > Open Script, and open your
load.pyfile - Highlight all of code and hit the Play button
- You have to do this each time you update the node code until you’re ready to distribute your plugin

Maya Script Editor. For my development projects I use Chris Zurbrigg's Charcoal Editor instead
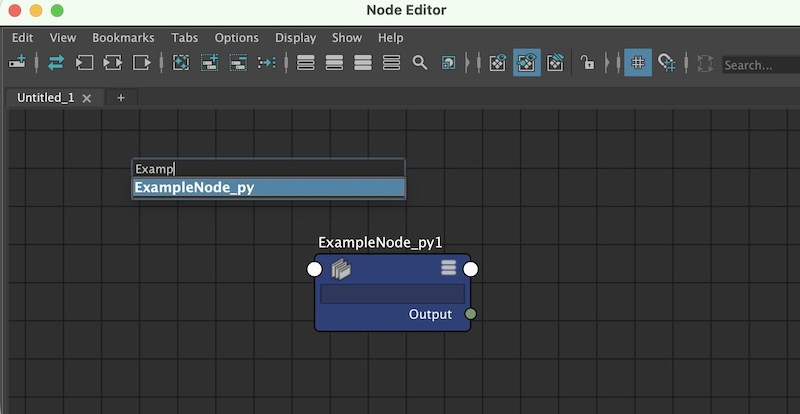
- Add the node to your scene
- Windows > Node Editor.
- Hit Tab and begin typing ExampleNode_py. Note that ‘ExampleNode_py’ is the name I gave the node in the
registerPluginfunction - Select ExampleNode_py when it comes up
- You can see a node added to the Node Editor
Maya Node Editor. You can certainly add the node to your scene using the createNode command instead.
- Select the node and open the Attribute Editor (Windows > General Editors > Attribute Editor)
The node should appear like this in the Attribute Editor
- Trigger the
computefunction- Recall that, on each scene evaluation Maya only recomputes the values required to update “dirty” plugs.
- In this instance, messing with the Inputs child attributes or the Called Out attribute with trigger the
computefunction. - Set the Called Out attribute to the following string: ‘attrA,attrB,attrE’
- Set the five inputs attributes to the following values:
'attrA:2.0','attrB:6.0','attrC:0.0','attrD:100.0','attrE:1.5' - Observe that the Output attribute is updated to
(2.0 * 6.0 * 1.5) = 18
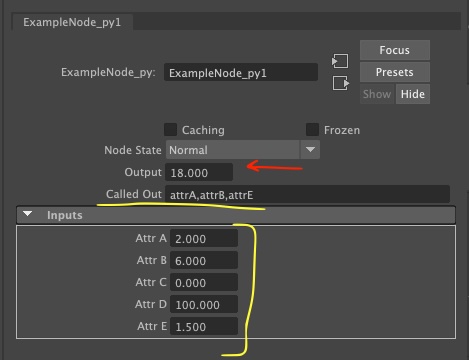
Notice how attrC and attrD values did not get included in the product
(Optional) TEST USING SCENE TIME: My favorite way to test a node with numeric inputs is to hook it up to the scene’s time node. This forces the compute function to re-evaluate each frame, meaning you can observe the node behavior by simply scrubbing the timeline.
- Locate the time1 node
- In the Outliner, under Display, untick ‘DAG objects only’. ‘DAG’ is not the same as ‘dependency graph’
- Locate the node called time1. You can use the search bar to find it.
- Select it
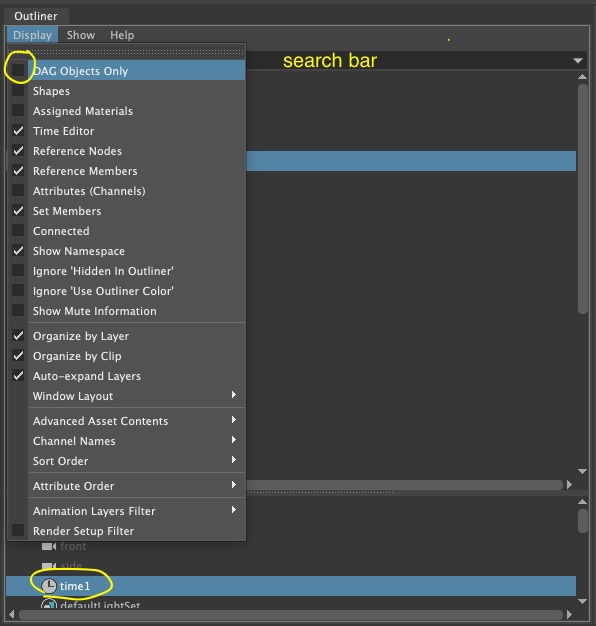
There is only one time1 node per scene
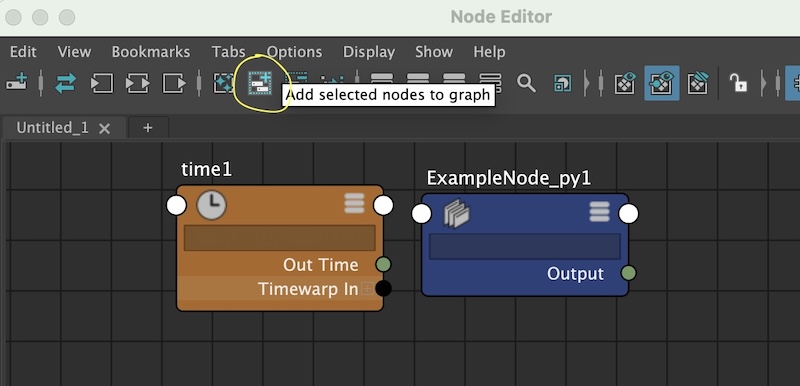
- Add the time1 node to the Node Editor
- In the Node Editor, hit the Add selected nodes to graph button
- The time1 node will pop up in the editor
- You can also locate the time1 node using a code snippet.
time1_node = cmds.ls(type='time')[0]
The add node button
- Connect the time1 node to the Attr A input on the ExampleNode
- Expose all the attributes on the ExampleNode via right-click > Show All Attributes
- Expand the ‘Inputs’ attribute
- Click + drag on the time1 node’s Out Time plug to connect it to the ExampleNode node’s Attr A plug
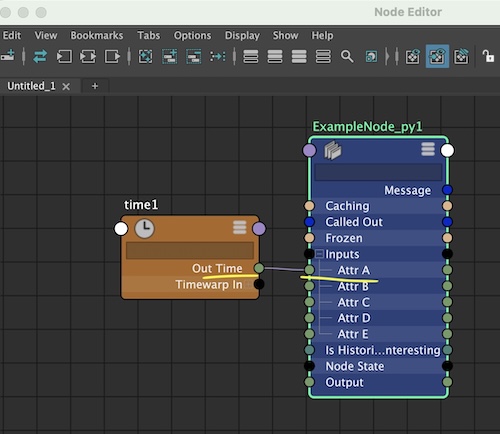
If you want to hide the unconnected attributes after doing this process, hit the hamburger icon in the ExampleNode upper-right corner
- Returning to the ExampleNode in the Attribute Editor, we now see the Attr A attribute has an incoming connection. Scrub the timeline to observe Output attribute updating based on current frame
updating based on time
ADDITIONAL RESOURCES: I hope experimenting with builtins in the context of Maya dependency graph nodes gives you a better grasp of the Maya Python API 2.0. Here are some of my favorite resources to learn more about the API:
- MObject entry in the Maya API
- This 2007 whitepaper about the Maya API
- Complete Maya Programming by David Gould. My copy is one of my most cherished possessions. It’s written for the C++ API (because the Python API did not exist in 2003), which I really like to read when I’m doing Python development because I feel it allows me a better grasp of the underlying architecture.
- This 2012 webcast series by Kristine Middlemiss really rocks if you are trying to wrap your head around the Maya architecture.
- Autodesk has the download hosted here
http://download.autodesk.com/media/adn/MayaAPI_Webcast_Recordings.zip - My VLC media player was having a hard time with the .wmv files that are extracted from the ZIP Archive, so I used FFMPEG in the terminal to convert them. From the folder I extracted into, I ran:
ffmpeg -i livemeeting.wmv -c:v libx264 -crf 23 -c:a aac -q:a 100 output.mp4
- Autodesk has the download hosted here