Using Motion Capture in an Animated Short Film
19 Apr 2021
Hello! This is the second workflow breakdown for my thesis film. It will concern the motion capture animation process. Check out the first post about using Unity to make a short film that covers the Unity workflow itself, and watch the film itself on my animations page.
Purpose: This post is designed for students or independent artists considering using motion capture for animated filmmaking, and would like an example of how I approached the process. For the sake of length, I will not be going into tutorial-level detail on the different MotionBuilder/Maya tools referred to, but I will post link to technical information as it comes up, and you can always leave questions in the comments section.
the steps in the mocap process.
top, left to right: reference, source data, retarget, character editing
bottom, left to right: combined scene, final cut, character editing
Differences with Keyframe Animation Workflow: For those coming from a keyframe character animation background, adjusting to motion capture may be a little weird, because even though mocap is classified as a type of animation, the actual motion capture and editing process is much more akin to working with video. I’ve listed some key differences below (if you’ve worked with video before, these are going to be familiar).
- You have more animation than you’ll need to use. It’s best to do multiple takes of each scene, so you can get the best performance out of the actors each time.
- You need to contend with the physical limitations of the capture space/system. I’ll talk more about this when I describe my own shoot.
- You’ll need to sync with audio. This is generally automatically accomplished in keyframing because the animator animates to the dialogue clip. I’ll talk more about this in the audio section.
- If you need another shot, you have to schedule another capture. You, of course, use keyframing to enhance the performance and fix visual problems. But combining a totally keyframed shot with motion capture shots is perilous, because the two animation techniques look very different next to each other. Human movement is much more fluid, while keyframing tends to produce a stylized, pose-based motion.
- The animator is not the actor. In keyframing, the animator makes all the decisions about a character’s physicality. In motion capture, the actor determines a character’s physicality, and the animator enhances it. This is also why you should put effort into finding the right actor for your mocap performance.
- You have to deal with people’s schedules, and you have to show up to the shoot with audio recording equipment, a video camera for reference footage, a shot list, scripts, etc. The motion capture session is much more like a video shoot than sitting down at the computer to animate.
Please note that motion capture is not necessarily easier than keyframe. It’s important to decide which animation technique is right for your project.
Software: For the animation workflow in this film, I used Autodesk MotionBuilder. Maya and Blender both have little mocap windows that are okay for retargeting a bit of motion, but once you get much beyond that, they’re insufficient.

MotionBuilder has many assets designed specially for editing mocap. Maya, by contrast, has only one mocap tool, the HIK window (outlined in red).
Capture
Space: I used the motion capture space in my university’s computer graphics lab, which was running a rather old version of Blade. It used RFID markers and had a 10’x20’ capture space. Additionally, there was a full time lab engineer to assist with the shoot and clean the data!

the lab engineer and I preparing for the shoot
There were several technical limitations of the space that I made a plan for:
- Facial animation: There were no headsets. The only manner we had to do facial capture was 96 tiny RFID markers on the faces of the actors, and they would have to give separate body performances. I knew, from previous experience that this would be a huge pain with poor results. So, I decided I would animate the faces with blendshapes, by hand.
- Finger animation: No gloves – same deal as faces. I decided I would animate fingers by hand as well.
- Space: The engineer thought that four markered-up characters in the space at a time would produce noisy data, so I decided to do two hour-long shoots with two actors using the space at the time.
- Props: We spiked the location of the chairs the actors sat in so they wouldn’t move between shoots.
- Takes: Unlike video, mocap captures every angle, so there’s not as much a need to plan out your cuts ahead of time. I preferred to let the actors give their performance uninterrupted for as long as I could, which in the case of our system, was two minutes. I split the script up into six two-minute sections, each of which would have multiple takes.
You need to come to a mocap shoot prepared with a shot list and a plan for how you’ll tackle “impossible” shots (i.e. shots that are physically impossible for a real human, or where multiple motions will need to be stitched together due to capture limitations). For example, if your character climbs stairs, you might bring a stepladder to the shoot and have them climb it, then create a loop out of their motion so you can animate them climbing an entire flight.

Here is several crossfaded animation clips (this processes discussed in more detail in the “Combination” section below) that represent a similar situation to the one described above. I had a character that needed to walk across the virtual room, which was wider than my capture space. I had the actor do the performance in multiple takes, then blended between them, as you see above.
Shoot: My actors and I had several rehearsals. On the days of the shoot, I took reference video to use in the animation process. The actors also wore wireless mics to capture audio (see Audio section).

Screenshot from the reference video taken during the shoot
I had one of the markered-up actors clap so we could sync the audio with the mocap. Big brain. It was very similar to directing live-action actors. I made notes of which Takes I liked the best, and gave them pointers on their performances. The only notable thing was that I didn’t worry about facial motion, as that wasn’t being recorded.

Audio: I used a boom mic and and wireless mics the capture the audio at the shoot. I ended up re-recording the dialogue in a sound booth because the acoustics in the capture room were not great, but I’m really glad I had the decent recording from the shoot to use for rough cuts.

Two of the actors listen to their line delivery from the shoot through headphones and re-record them in a sound booth.
Animation
Folder Structure: Ahhh, file management. So boring yet so crucial. Much like the pancreas. I pretty much followed the Maya Project folder structure, but I created another sub-folder in “scenes” corresponding to each major step in the motion capture animation process. “Major” is kind of up to interpretation, but in general, each time I plotted motion or changed the number of characters in a MoBu scene, that was considered a new step. The following sections, with the exception of “Set Cameras” correspond to each major step.
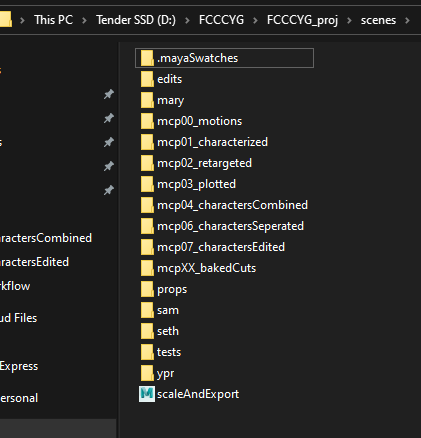
Folders with preface "mcp" will be discussed below. The other folders contain modeling and rigging files.
Motions: In order to retarget data in MoBu, both the source skeleton and the destination skeleton have to be characterized. I selected my favorite Takes of each section, and characterized the source skeletons. A video tutorial on characterizing motion skeletons can be found here, but it broad strokes, the process I use for characterizing the skeleton is:
- Create a new Take
- Rotate the skeleton’s bones so that they’re facing +Z axis and they’re in a t-pose
- Characterize the skeleton
- Switch back to the performance take
- Save the file
You can also just have your actor start the take in a t-pose, and characterize from there, but I prefer to create the t-pose myself, because a human body can’t do a perfect t-pose.

The above two images are the same source motion file. Top is the actors' performance, bottom is the Take that I created with the t-poses for characterization

The above two images are the same source motion file. Top is the actors' performance, bottom is the Take that I created with the t-poses for characterization
Characterized Characters: Next, I prepared my character files. These were to be the base files that I retargeted the motion to. I made my characters and rigs in Maya. I’m not going to go through all of the character-prep work here, because I have another post about creating a rig and getting it set up in MotionBuilder, located here. Additionally, there’s resources around the web about creating a MoBu-compatible rig. To set you off:

left: rig in Maya. Note the single hierarchy of all the bones and roll bones in legs and arms right: characterized character in MoBu. Notice the assets in the Navigato
Retarget: I merged the motion file and the corresponding character files to a new scene, then retargeted the motion to the character. All this entails is setting the “Source” of the character to be the source motion skeleton.
left: source motion
right: retargeted motion, with reference in the corner
Then, fiddle with the retarget settings to get the results you want:

If you select the character in the Navigator, the retarget settings are displayed in the Properties window. I suggest expanding the pullout menu of each section and seeing if any of the sliders help your retarget.
Plot: This is just plotting the motion onto the character’s control rig, so it’s no longer dependent on the source skeleton. I then fixed only the major issues, such as the character’s hips being way too low. After that, I plotted the motion onto the character’s skeleton.
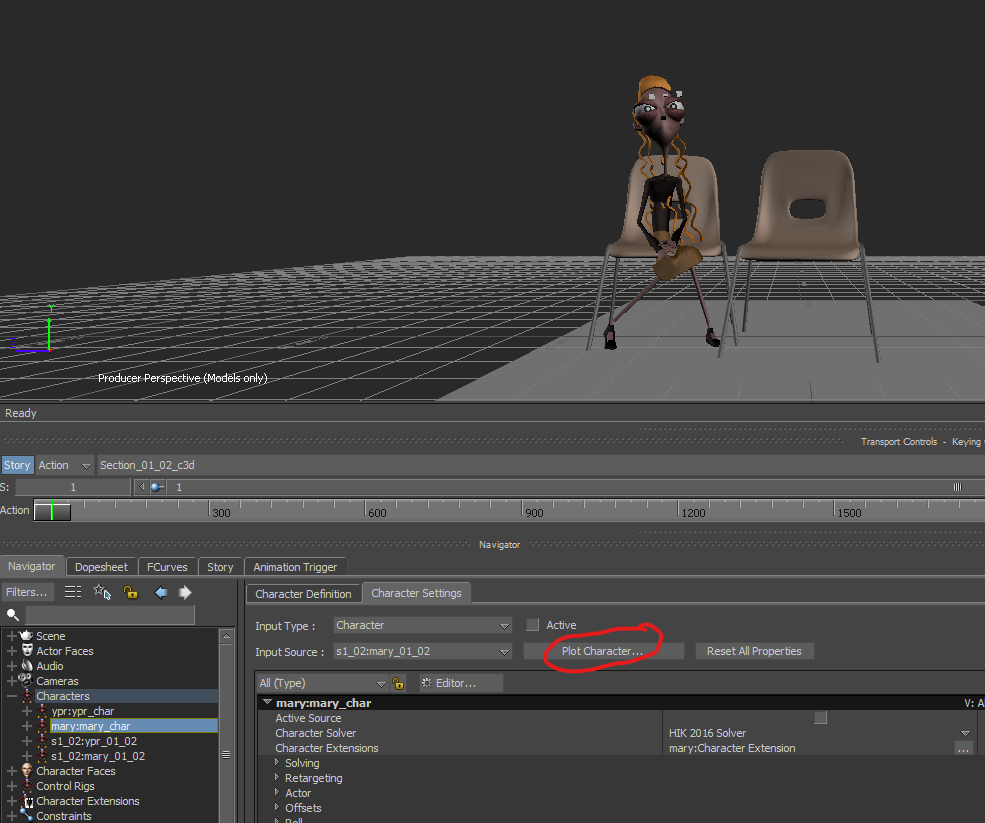
Plot button circled in red. This character had the tendency to clip through her chair. That was the only issue I fixed before the initial plot.
Combine Performances: Next, I created a new scene, and merged in a copy of each of the four characters. I then used the Story window to import the plotted animation files for each character and add in the audio.

I used my reference video to line up the motion with the audio. You can also see above that I used the captured rough audio from the shoot to help lining up as well.
The Story tool works pretty much like a NLE video program like Premiere. You can cut and crossfade between the clips. Right click on one of the clips to see the menu options for the clip. Particularly important are “Change Take” and “Change Character”, which allow you to select the correct character and take from the source file. For more information on the Story tool, you can look at this Mocappy’s tutorial. It’s a bit long, scroll down to the middle of the post to get to the information about the Story tool. You should also look at the MotionBuilder documentation Story Window section.

top: Story window at beginning of combination
bottom: Story window with performance combination completed
You may have noticed that the characters inhabit a room larger than 10’x20’ in the short, and are sitting further away from each other than they did in the capture. Additionally, in some shots, they walk further than a single take could have accommodated. To stitch the takes together, I made liberal use of the Story window’s Ghosts feature, which allows you to visualize and translate the global location of an animation clip. Combined with crossfading the clips, you can get quite seamless transitions between motions by moving a Story window’s clips Ghosts. If a transition between clips still looked lerp-y, I would fix it using the control rig in the Editing phase (see Edit Characters section).

Here, Youth Pastor Rick's Ghosts are enabled. There are two ghosts for each clip -- the start pose, and the end post -- and the ghost color corresponds to the clip color (below)

To enable a character's ghosts, click the eye icon circled in red
Set Cameras: At this point, I exported the scene to Unity, and set the Cameras. I set the cameras at this point because I didn’t want to clean up and edit animation that was not going to be visible in frame! I’m not going to go into too much detail because I talk about setting the cameras in my other post about the Unity side of this workflow. If you’re using Maya or 3DS Max, at this point I would decide which parts of the characters performances are going to be in the shot. Below are Vimeo embeds with with my final cameras next to the first round of setting cameras (I reevaluated them several times over the course of the production).
left: final film
right: first rough cut with the set cameras
left: final film
right: first rough cut with the set cameras
Separate Characters: Once I had a firm grasp on when the characters would be in-frame, I baked the animation from the Story window to the characters in the scene, and exported each character to it’s own file for editing.

You can see in my folder structure that I have separated out the characters
Edit Characters: The most time-consuming portion of the process was editing the animation of each character. This occurred in three main steps: correct and enhance body mechanics, facial animation, and hand animation. Below shows a close-up before and after the editing process:
left: pre-editing
right: post-editing, with reference in corner
For body mechanics correction and enhancement, I just keyed the control rig. For information about how to interface with the control rig, see the MotionBuilder documentation. I recommend making a new animation layer for each body part so you can keep track of your adjustments easier.
For the facial animation, I first used the Voice Device to get a base level of lip sync. I have another post on how to use the Voice Device, located here. After that, I used the Actor Face to edit the other facial features and fine-tune the lip sync. I recommend making a new layer for each facial feature. For more information on facial animation, I recommend this section of the MotionBuilder documentation.
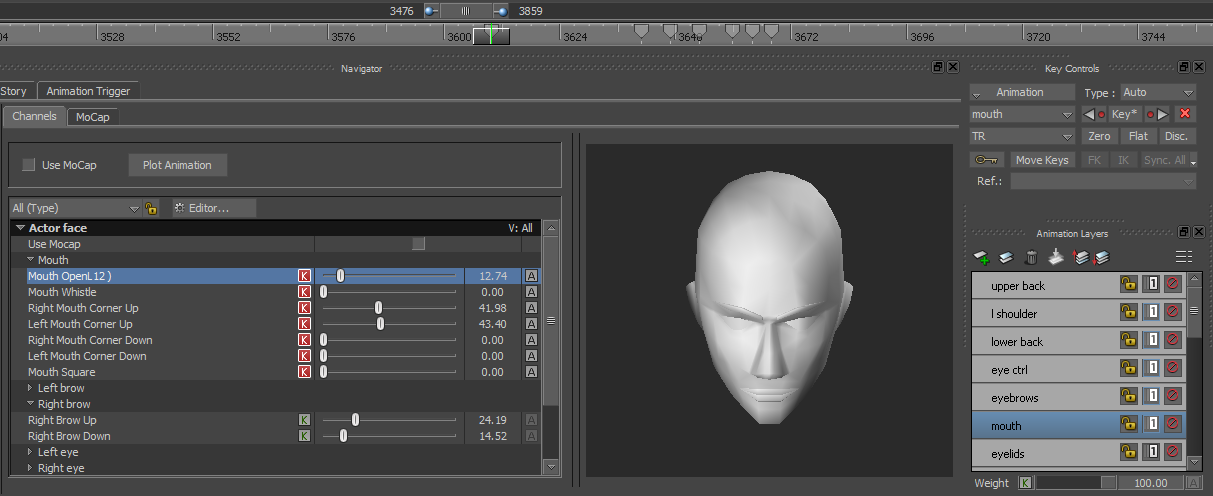
For finger animation, I used the control rig. I made a new layer for head hand’s fingers. You can access the finger controls by expanding the triangle menu near the hand in the control rig window:

When I created the characters, I also created a set of poses for common finger positions (flat, relaxed, fist, etc.). It’s much easier to just use the Pose Editor to achieve these different positions than hand-keying them every time. You can find out how to use the pose editor in the MotionBuilder documentation. To apply a pose to only certain body parts, make sure you’re in body part selection mode, select the body parts, paste the pose, and hit “S” to keyframe.
I did several passes of editing, baking the animation (next step) and importing the characters into Unity and evaluating the shots, deciding which needed further animation editing. I also animated interactions with props and the chairs.
Baking: The last step is to bake all of the animation to the character’s joints and blend shapes, and export it. You’d think it would be a single click to bake, but not so! You first have to record the lip sync to the character face, then plot the actor face and character face, then plot the body animation. This is not very well documented, so I’ve just put the process below.

First hit the record button, and hit "Overwrite" in the pop-up. You have to play through the timeline afterwards. This records the voice device phoneme information to the Take.
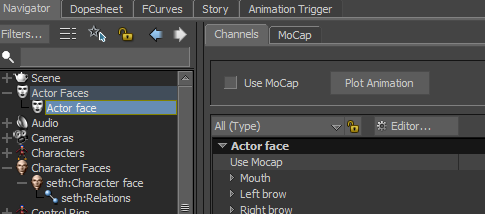
Then, plot facial animation on the actor face
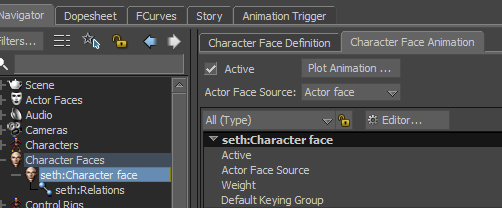
Then, plot the character animation on the character face
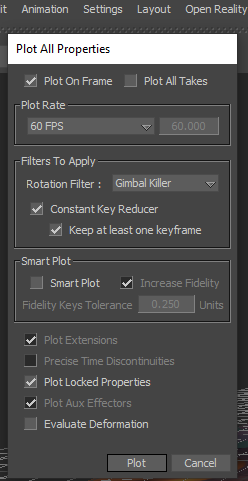
Then, plot the body animation from Animation > Plot
Conclusion
I really love using motion capture. I think it’s the best of both worlds, because you get to work with actors on physicality, but you also get to have the creative freedom and technical fun that CGI provides. Additionally, if you’re okay with somewhat non-stylized movement and humanoid characters, it can help you get lots of animation data onto characters pretty fast (there’s tons of cleanup involved, but it still takes less time than keyframing). If you can get into a mocap lab, I recommend it!
Anyway, after everything is successfully baked, I exported the characters to Maya, and then Unity! There was a lot else that went into the project – this post only covered the motion capture and retargeting and animation process. If you’re curious about the rest of the workflow, you can read my other post on the project. And, of course, watch the film!