Making a Short Film in Unity
10 May 2020
Hello! I recently completed production on 8-minute 3D animated short, which I made using Unity. In this post, I’ll be breaking down my workflow, from character modeling to final render. I’ll also be evaluating the merits and limitations of using Unity in this way. This is probably going to be a chonky post, so below is my list of content, so you can scroll to whichever section interests you, or read the whole thing if you want to get a picture of the overall workflow. There’s also a link to the completed film and the Unity packages I used at various points in the pipeline.
- Pre-Unity work
- Importing Assets
- Shading
- Post-Processing Effects
- Setting Up the Timeline
- Cameras
- Outputting/Recording
- Editing
- Troubleshooting Visual Artifacts
- Evaluation
Packages Used: Unity Recorder, Unity Timeline, Post-Processing v2, Cinemachine, Toon Standard, Post-Processing Utilities
Software Used (visuals): Maya, Motionbuilder, Photoshop, After Effects, Premiere Pro, Unity
Pre-Unity: This should be review for anybody who has imported a custom character for Unity before. Each character asset that I imported contained the following:
- character mesh that was modeled/UV’d/textured/rigged in Maya. For details on how to rig a character that will work in Unity, please read my post on the subject. Please note that Unity does NOT support smooth mesh preview, so if you want smooth meshes, you need to perform a smoothing operation before you export the FBX.
- an animation that contained the entire performance for that character. I used custom motion capture for the character animation. All the animation on the character was imported in a single take. I discuss this in more detail in the Setting Up the Timeline section.
- temporary materials that I assigned in Maya. It is important that, if a single mesh is to have multiple materials, you assign a DISTINCT material to each them in your 3D software. For example, Sam’s body mesh had a shirt material, two different types of skin material, shorts material, etc. I gave all those components their own material in Maya.
Importing: The important things to worry about in the character’s import settings are:
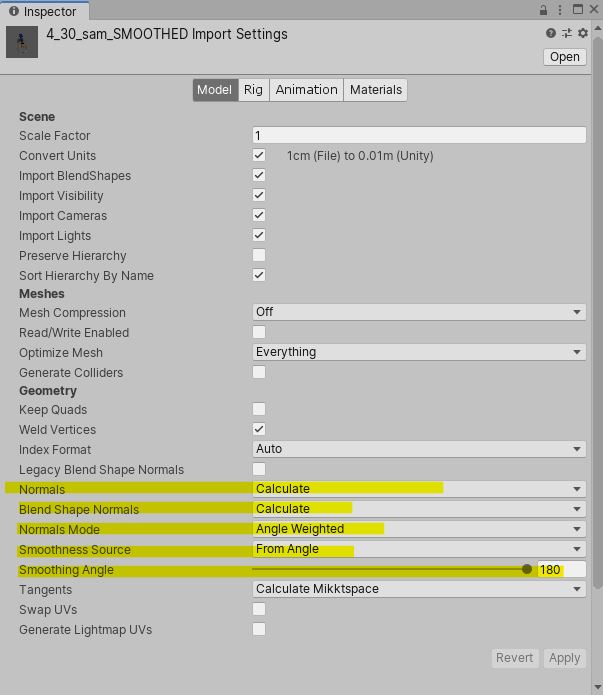
If you want the character to have a Smooth appearance, in the Model tab, you need to change the Normals to Calculate, the Blend Shape Normals to Calculate, the Normals mode to Calculate, the Smoothness Source to From Angle, and the Smoothing Angle to 180. I also might turn off Mesh Compression Off, but it’s not a big deal.
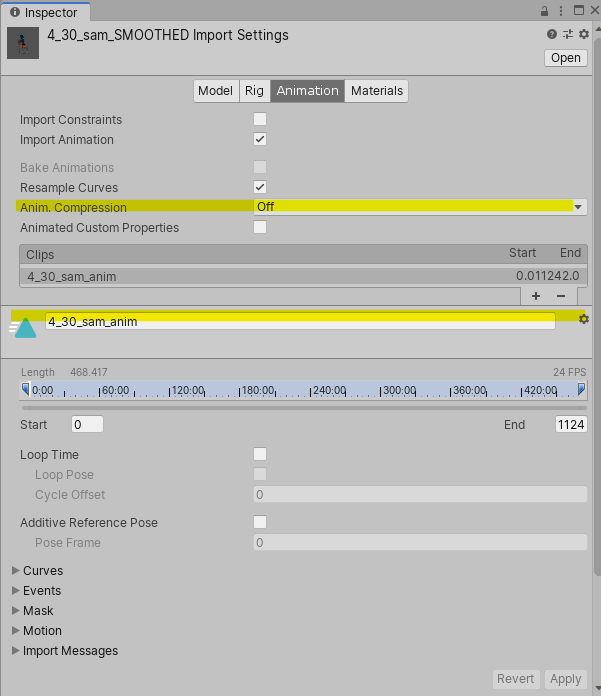
In the Animation tab, you should rename Take 01 to something more recognizable, and untick “Animation Compression.”
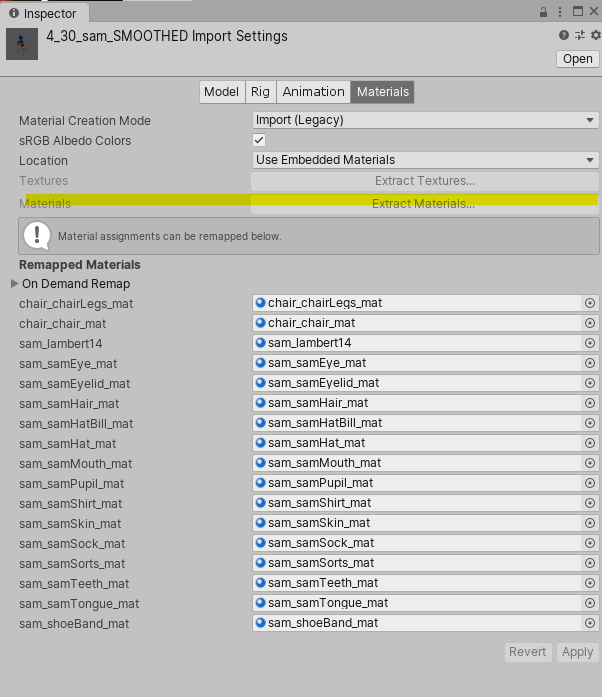
In the Materials tab, you should Extract Materials.
Cel Shading:
This section is just a plug. I used Adrian Biagioli’s Toon Standard Shader for the cel shading. It’s a pimped-out toon shader – you can define a custom lighting ramp, use specular dabs (like an alpha mask over the specularity), and enable energy conservation.
Also, he’s working on making it run on the Scriptable Render Pipeline, so that there can be physically based attributes (e.g. reflections) that work with the cel shading. Super cool – definitely keep it in mind if you need a toon shader in the future.

Here, you can see how I could manipulate the toon ramp to get different effects (I ultimately went with the one on the right). The red on her ears is actually red specularity.
Post-Processing Effects:
One of the coolest things about Unity is its out-of-the-box look development tools, which allows you to do your color grading before you render. This is probably a little weird for people who are used to the Maya workflow of rendering AOVs and doing color grading in After Effects. The latter method is definitely more versatile, but I found Unity’s Post-Processing Stack to be perfectly sufficient.

This is what it looked like with no Post-Processing...
To get started, create an empty GameObject, then add the Post-Processing Volume component. After that, add a Post-Processing Layer to the Main Camera.
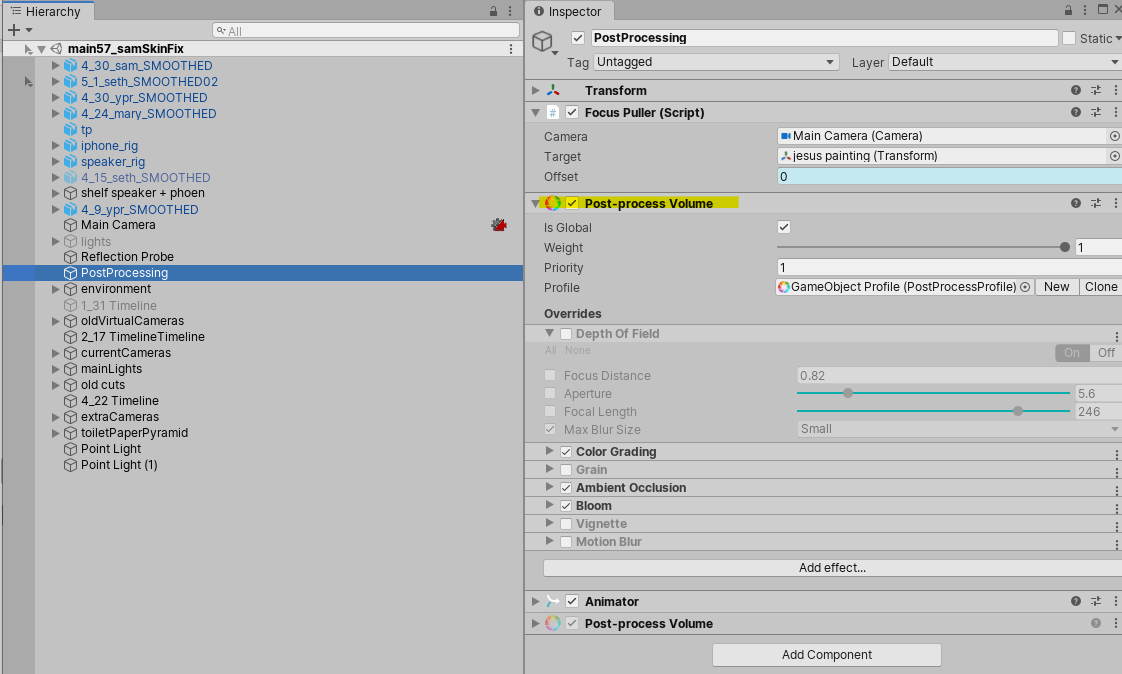
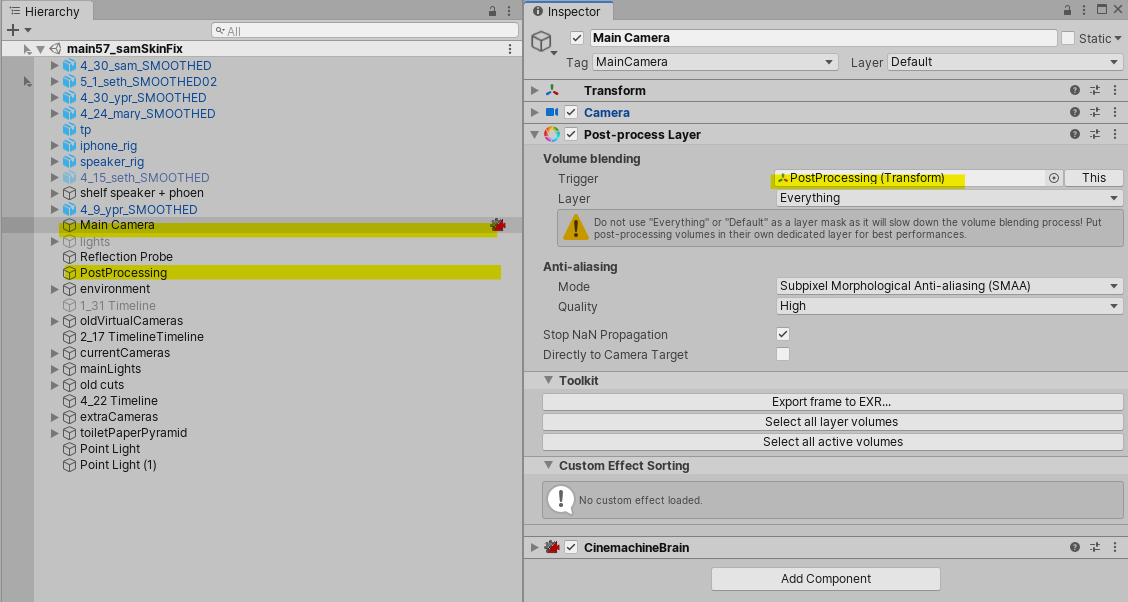
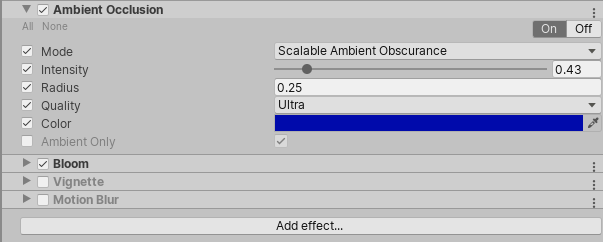
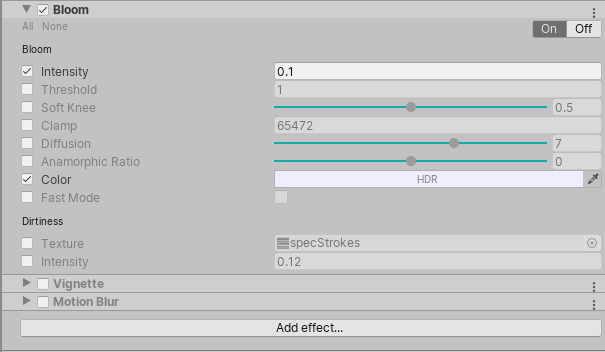
The post-processing effects I used in this short are: Ambient Occlusion, Bloom, and Color Grading. Below is a screenshot of each of my settings for each effect.
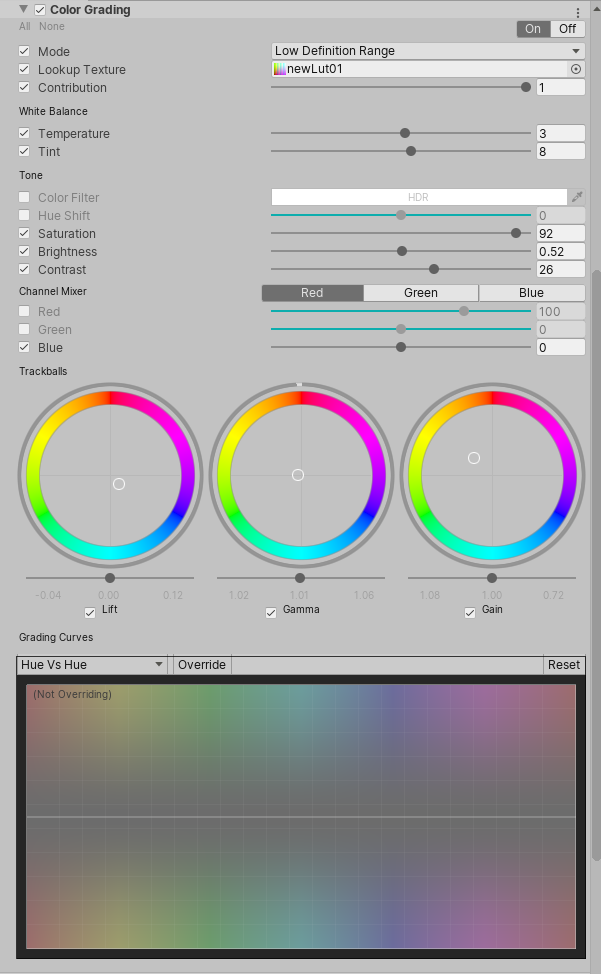
Unity lets you use a custom LUT, so you can do your color grading in Photoshop and have it apply to your scene.


with the LUT turned off and on
I found the Anti-Aliasing to be a little lackluster, so I Super Sampled. I’ll talk more about this in the Recording section.
Also, you might notice that I did not use Depth of Field, but in the short, I use DoF. Depth of Field is a global setting, meaning that it sets the same Depth of Field for every shot. How useless. I’ll talk about how to change the Depth of Field on each shot in the Cameras section.
Setting up the Timeline:
For complete information about the timeline, you should check out the Unity documentation. You probably will need to install the Unity Timeline package through the Package Manager. Once it is installed, you should be able to open the Timeline window by navigating to Windows > Sequencing > Timeline. Create an empty GameObject for the Timeline to go onto, and in the Timeline window, hit Create.
This will create a .playable file where you can decide the frame rate and whether you want the Timeline’s duration to be fixed.
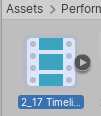
The important thing to understand is that Timeline is the god of what happens in your scene. The next step is to begin adding various elements of your film to the Timeline so they will playback. You do this by creating Tracks (clicking on the little “+” in the left corner of the Timeline window and selecting the type of track you want).
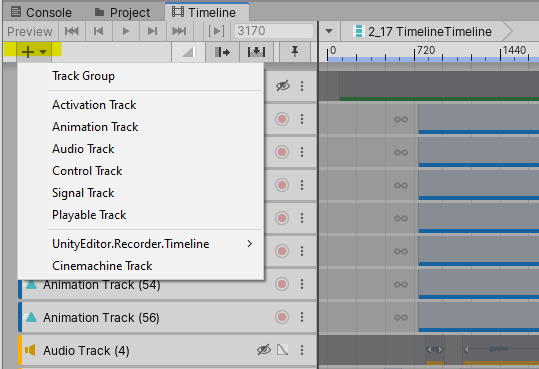
I used Animation, Audio, and Cinemachine tracks in this project.

You can see my whole Timeline here. At the top, in green, is the Recorder tracks. Next, light blue, the Animation Tracks controlling my characters. Next, yellow, the audio. Next, red, Cinemachine camera tracks. At the bottom, all the Animation Tracks in grey are the camera animations.
The input for an animation track is an Animator Controller, so any element that you want to animate with the Timeline needs an Animator Controller. I just made a really simple one for each character that had the animation that imported with the character, and attached it to the character in the scene.

All the characters, with their Animator Controller
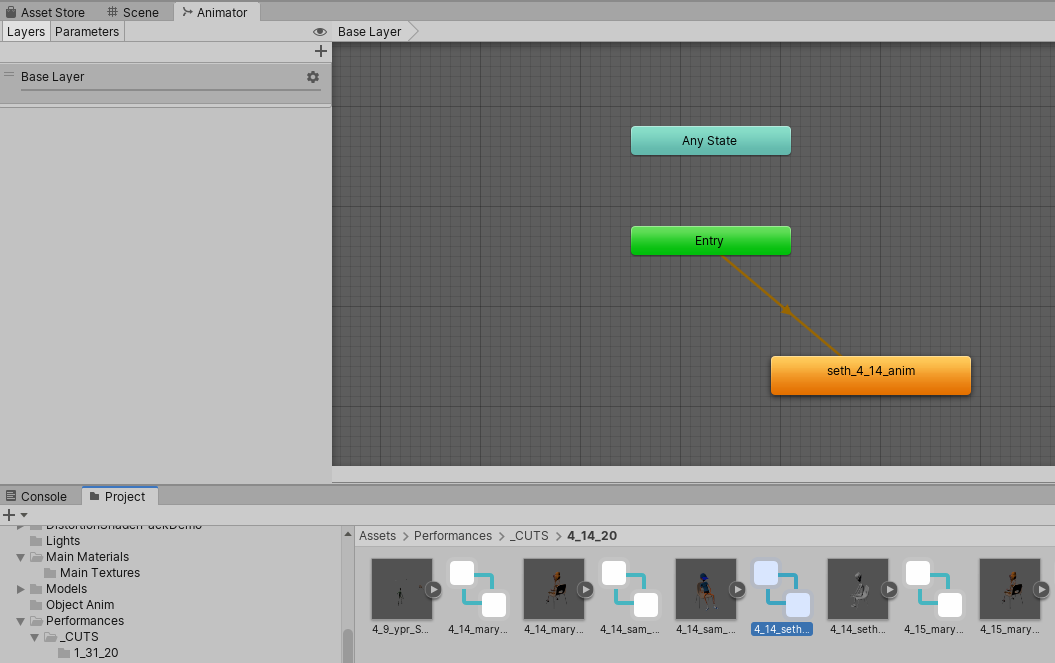
Setting up the Animator Controllers
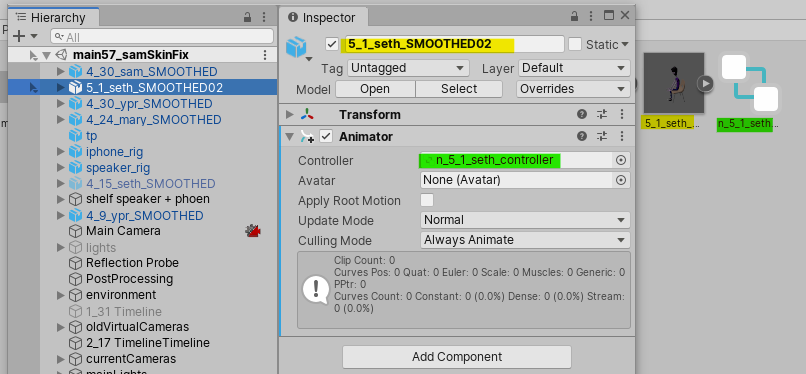
Once you drag a character into the scene, you assign the corresponding Animator Controller to the Animator component. Then, you add that character to the Animation track on the Timeline, and drag in the clip with their Animation.
Once you’ve created the Animator Controller and assigned it to an Animation Track in the Timeline, you can drag and drop the characters animation clip into the Timeline:
You can cut/paste the clips, and blend between them. Like I said above, I imported the entire performance with the character, which means I only had one animation clip. However, you can use multiple different animation clips in the timeline
Cameras
Youth Group Four has lots of camera movement. I used Cinemachine, but animated the cameras by hand. For those of you familiar with Cinemachine, this might seem like it defeats the point, since Cinemachine is designed to automate object tracking. So you might ask “why not just use regular cameras?” I will tell you:
- The Timeline has a Cinemachine track, meaning if you want to switch between multiple cameras on the Timeline, it makes sense to use Cinemachine
- Cinemachine Virtual Cameras have a Post-Processing Layer, which overrides the Global Post-Processing settings. This is very important for depth of field. I’ll discuss this more later in the section.
- You can still use the Cinemachine tracking and following if you want. I ended up using the Noise Extension on a number of shots.
I spent a long time trying to get the Cinemachine tracking features to get me the moves I wanted, until I realized that I would get better results if I just did it by hand. In video games, you can get away with jerky or awkward camera movements, but people won’t forgive you for that in filmmaking. So if you’re doing a more complicated move than a simple follow, it’s just best to animate the move yourself.
Anyway, let’s break down the process for creating one of these shots. I’ll do one of the most complicated ones, the first part of Seth’s rant:
First, I’d create a Virtual Camera, and then rename it:
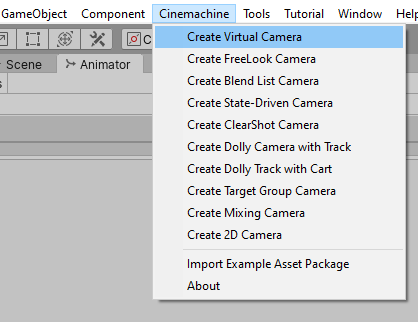
Make sure to install the Cinemachine package, or you won't see this menu
Then, because you need an Animator Controller to animate something, I’ll create an Animator Controller for that camera. I ended up storing all my camera Animator Controllers in one folder:

All my Camera animators (and a few animation clips, because I have bad assets management)
Next, I’d drag the Camera into the Cinemachine Track in the Timeline, to create a Camera clip.

Next, I’d create an Animation Track, and select the Camera as the source (obviously, if the Camera won’t be animated, you don’t need to do this). If you don’t see your camera, double check that you assigned it an Animator Controller.
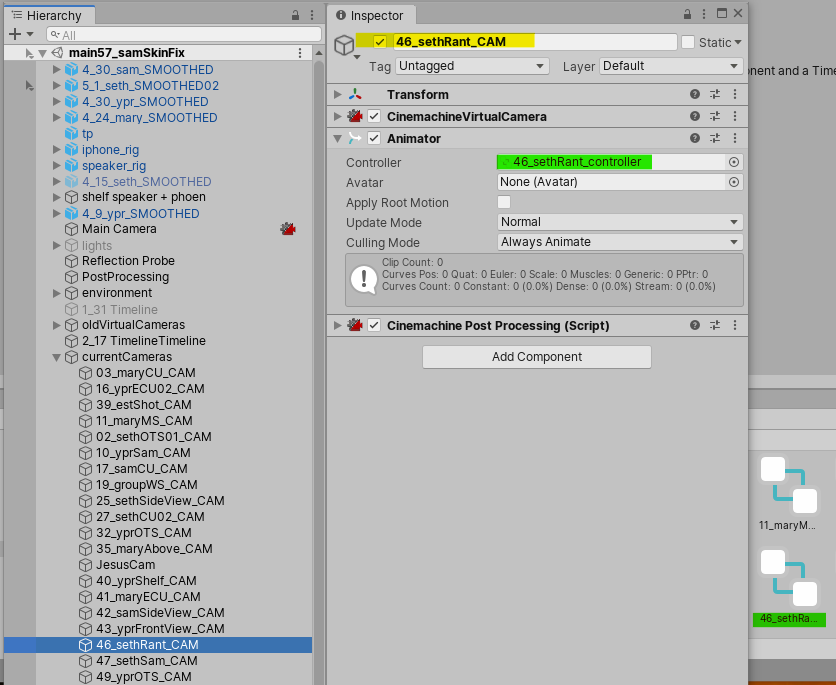
The colored highlights denote the same asset

Next, I’d hit the Record button on the track, and start setting the Camera movement. You can also right-click on the Clip and Hit “Edit in Animation Window,” which I found useful

Once I was happy with the movement, I’d click the Record button again to stop Recording.
Now, for Depth of Field. If you used the Depth of Field Post-Processing effect, the focus on the shot is probably messed up. To set a custom Depth of Field for the shot, click on the Camera, and where it says “Extension”, select “Cinemachine Post-Process Script.” Select “New” to create a Post-Processing profile for the Camera, and tick the Depth of Field effect. If you don’t know how Depth of Field works in a regular camera, it’s time to learn.
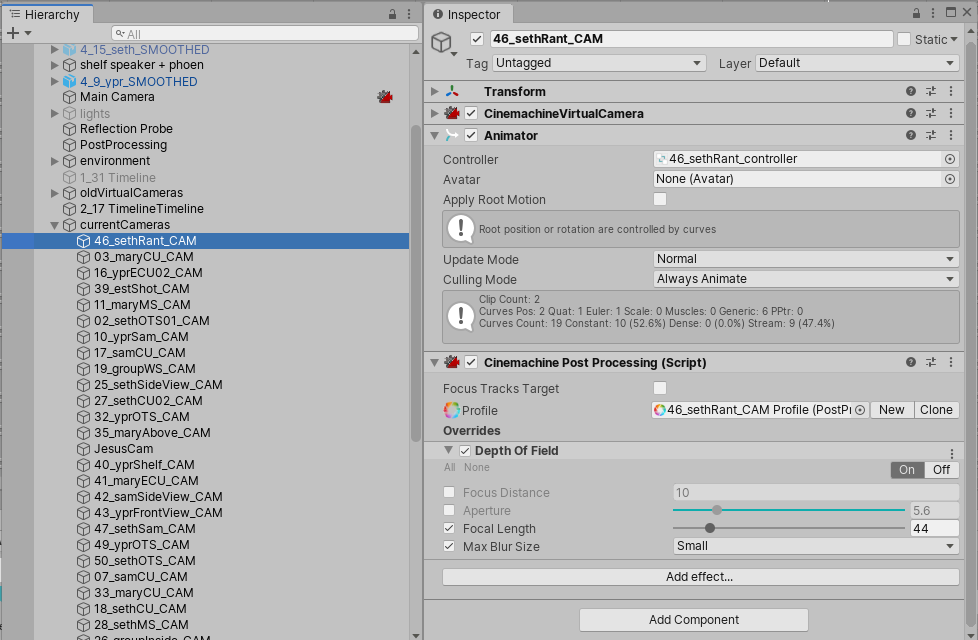
Adjust the Depth of Field attributes in the following order: Focal Length, Aperture, Max Blur Size, Focus Distance. Now, you’re shot should have proper DoF…unless, of course, the Camera moves. In real life, there’s a position on a film set called a “focus puller” whose job it is to adjust the focus of the camera. In Unity, we’ll just animate the focus. There’s a Focus Offset attribute of the Cinemachine Virtual Cameras, but that only works if your Cinemachine cameras have a target, which mine did not. So, I used Keijiro Takahashi’s Focus Puller in his Post-Processing Utilities package, which works in the Editor. Then I animated the “Offset” Value.
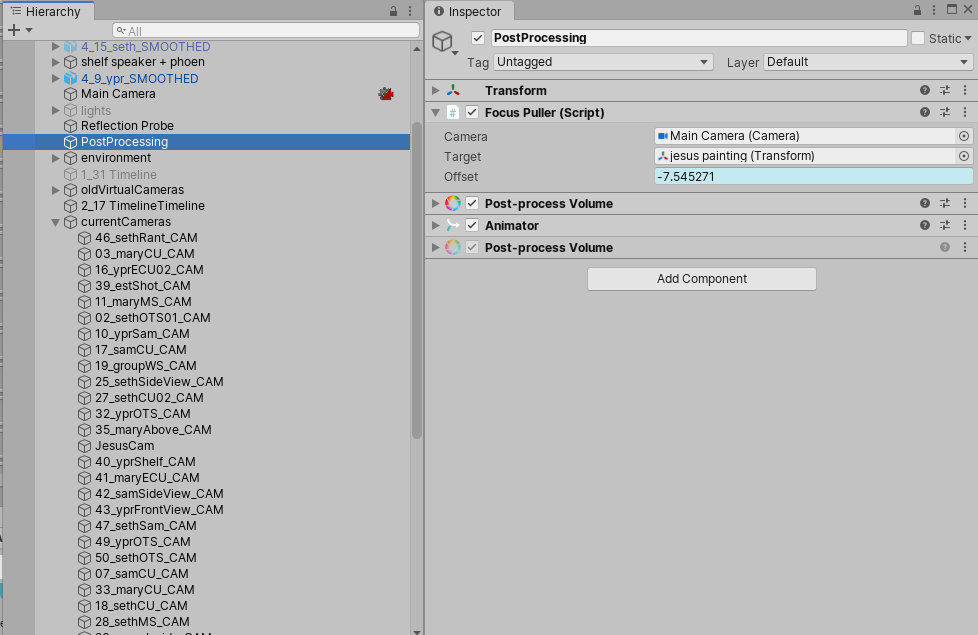
Recording
The Unity Recorder package allows you to Record the Game View in a couple different ways. You can create a Recording using the Window > General > Recorder Window, but I prefer to make a Recorder clip in the timeline, so I can pick and choose what parts of the animation get recorded. To do this, I create a Recorder Track. Once you do that, right click on the Recorder Track and select “Add Recorder Clip.”
Once you have your recorder clip, click on it and Adjust the settings in the Inspector. You can choose to have Unity output an image sequence, or movie file. Below are the recorder settings I used.
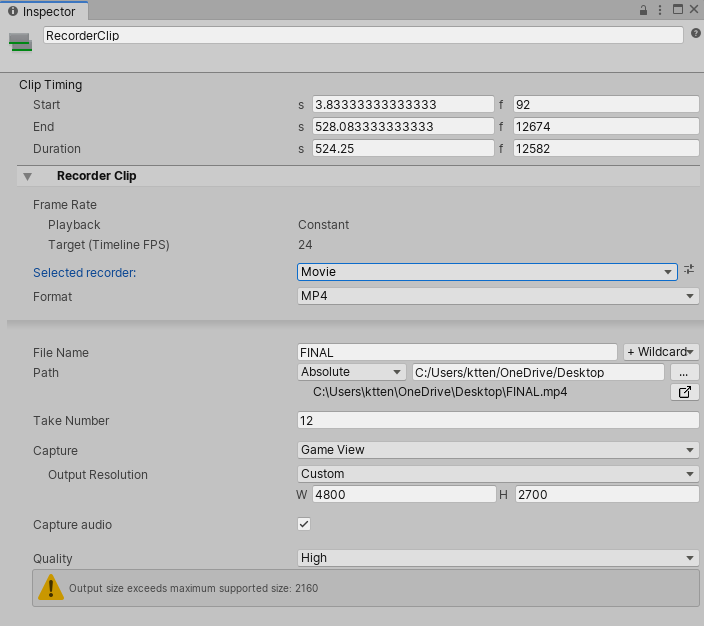
You might be noticing that my output resolution is REALLY high. This is because, to improve anti-aliasing, I super-sampled, which is where you render at a higher resolution then downsample for the final output. This will increase your render time, but since you’re not trying to render in realtime anyway, who cares? Unity gave me that little error message in the recorder clip’s inspector about the Output size, but it didn’t cause any problems.
The last thing to do is make sure that your Game View resolution matches the Output resolution. Having a very high resolution Game View will make Unity run slow, so usually changing that Game View resolution was my last step.

After that, hit the Play button, and wait for your recording to be created. At 4800x2700, the 7ish minutes of animation took about 45 minutes to render out, with no light-baking or AO-baking. If I was doing a quick 1920x1080 recording, just for a rough cut, it would be a little slower than real-time.
I used the Ultra quality settings in the Project Settings.
Editing
After you export your .mp4, you can edit it however you want. Please note that the audio exports with lossy compression, so it’s a good idea to score your film outside of Unity. The video is not compressed.
Additionally, if you’ll be making additional edits to the visuals in your NLE (cutting, fading, etc.), I have one VERY IMPORTANT tip. Do not do those edits directly to the footage. Create a composition/timeline/sequence with the entire .mp4 from Unity in it, and do your edits to that composition. So, for example, in Premiere Pro, I made a Nested Sequence that contained my recording from Unity, then in my main Sequence, I edited the Nested Sequence. That way, I could drop a new recording into the Nested Sequence, and my edits would carry over:

On the left is my master composition. The light green on the top is the nested composition, inside of which is the uncut videos exports from Unity, in the blue, on the right.
Second, if you super-sampled, make sure you render out at a lower resolution (e.g., I rendered from Unity at 4800x2700, but I exported from Premiere Pro at 1920x1080).
Visual Artifacts:
I found that Unity’s renderer produces a lot more visual artifacts than, for example, Arnold. This makes sense, because it’s designed to render in realtime, so it takes shortcuts. Below are a few tips for dealing with visual artifacts:
- Super-Sampling: I’ve talked about this above, but remember, rendering at a higher resolution only reduces visual artifacts if you then reduce the resolution. Make sure to export from you NLE before you begin debugging visual artifacts. Super-sampling will solve jagged edges on your models (AA), little flickers, and sometimes normal-map swimming.
- If you noticed that ambient occlusion causes your normals to swim, make sure that you’re using the correct AO mode. You also might Bake the AO map.
- Flickering: If you notice flickering between two objects, it’s probably z-fighting. Set the render mode for one of the objects to “Transparent” (shout out to toon-shader Adrian for helping me with that one).
- Flashing Light on a Dynamic Object: Sometimes, an object will flash if it moves in and out of a light’s sphere of influence. Make sure that in the model’s import settings, you have “Calculate” checked for the Normals.
Evaluation
My goal with this project was to use a more iterative approach to creating 3D animation for students and independent artists. I feel that, unless you have access to a render farm, the “traditional” way of making 3D animation is incredibly restrictive. I hated biting my fingernails, waiting for renders, and I hated not having time to revise a shot because I couldn’t afford to render it again. For this project, in particular, having a dynamic camera was really important, and those camera movements require a lot of revision. I obviously still could do movements like that in Maya, but it’s hard to figure out if a shot is working unless you see the final render.
Furthermore, I noticed that a lot of 3D animations, particularly student 3D animations, tend to look very same-ey. I think this comes from popular design choices (see: sausage mouth), but also from a standardization of our techniques and of the aesthetics we deem impressive. In a super commercialized art form, both the techniques and the aesthetics are set by the big studios (Pixar, Disney, Dreamworks). I’m not trying to shit on this aesthetic or the people who use it but I think students and independents trying to emulate the work and workflows of a multi-million dollar company with dozens of artists working on each shot creates a lot of short films that look like bad Pixar, instead of good something-else. And I think it creates a lot of unnecessary stress for people who spend 30 minutes/frame rendering because they feel like their cartoon character’s skin needs subsurface scattering in order for their film to be taken seriously.
Also, I’m in no way an expert in computer graphics, but from what I can tell, real-time rendering is the direction in which the animation industry is moving. We’re just now getting real-time path-tracing in game engines, and Unity’s Timeline tool is only a couple years old. I know I’m not the first person to make an animation like this, and I think, in the future, we’re going too see more films made with workflows like this one.
Okay, now I’ll talk about some cons. This workflow is definitely not super intuitive. There’s a lot of extra importing and setting-up that goes into getting the timeline working. Additionally – and this is a big one – there are some limitations to what you can achieve artistically with Unity:
- Rigs have to be fairly simple
- Hyper-realism is difficult
- Simulations are less robust
- You have to work hard to overcome a “gamey” aesthetic
For me, I was making a super-stylized cartoon with flat shading, so points 2 and 3 didn’t matter that much to me. I was using motion capture for the animation, which requires a similar type of rig to Unity, so it didn’t matter that I couldn’t get super stylized animation. Point 4 is tough, but can be overcome with smart use of Post-Processing. These are all things to consider when deciding whether or not this workflow would work for your project.
Conclusion
Thanks for taking the time to read this! In the future, I might do a blog post about the animation process on this project, since that’s a whole different bag of worms. If you have any questions, please drop them in the comments, or DM me on Instagram (@kteender).