MotionBuilder Character Setup
18 Dec 2019
I wanted to share my process for setting up a character for mocap retargeting and facial animation in MotionBuilder. I prefer to make a clean character file to retarget onto, with all the possible assets that I would need for a given project. Having all assets on a character from the beginning of the retargeting process minimizes the risk of realizing I need another feature (character face, voice device, etc.) later on, when I’ve already created several motions, and might need to set up the same asset on multiple files. In fact, I think of character setup as the final step in the rigging process, rather than the first step in the animation process. It’s just better pipeline management.
To begin, I’ll think about all the types of animation I need to do for a given project, and create a checklist of all the assets and features I need to set up. I do this before opening the software, to keep me from getting bogged down in little details and forgetting something important. For this project, I’ll be using a character called Youth Pastor Rick (shortened to YPR), who is a character in my thesis film at the Carnegie Mellon School of Art. The film isn’t out yet, but if you’d like to follow its development, you can stalk me on Instagram (@kteender).
The checklist for YPR (and all the characters in my thesis film) is as follows:
In Maya:
- Smooth any geometry that will be annoying if you have to work with it without smooth mesh preview. MotionBuilder does not have a smooth mesh preview. If you have decent geometry, it’s not going to be a huge issue to work in un-smoothed mode. However, sometimes things like teeth and hair can be annoying to look at un-smoothed. Teeth especially can effect how you animate the mouth, so it’s better to just smooth them. From the modeling menu set, go to Mesh > Smooth. Furthermore, if Unity is the final step in your pipeline, it’s good idea not to be working in smooth mode anyway. It’s better to select your mesh and go to Mesh Display > Soften Edges, since this is closer to how Unity creates the “smooth mesh” look by using vertex tangents. But I digress.
- Create blend shapes for facial animation. See “Check blend shapes and skinning” below.
- Set up a hierarchy skeleton with roll bones. I’m not going to go into this step here because there’s a great tutorial for this step on Mocappys. I followed it through the “Skin Character” step.
- Ensure that the mesh is properly UV’d. This is especially important if you’re using a game engine in your pipeline – sometimes having UV issues, like more than one UDIM (UV tiles), can create problems with the mesh renderer.
- Delete extra objects. Save a backup version, then delete everything except for the rig and the mesh. The fewer objects, the easier your life is going to be.
- Send to MotionBuilder. If your Maya and your MoBu are the same version, you can use File > Send to MotionBuilder. Otherwise, export your rig as an FBX, and open it in MoBu.

All joints must be connected, with the root at the hip, for proper characterization in Mobu. I created joints for the eyelids, jaw, and eyebrows as well.
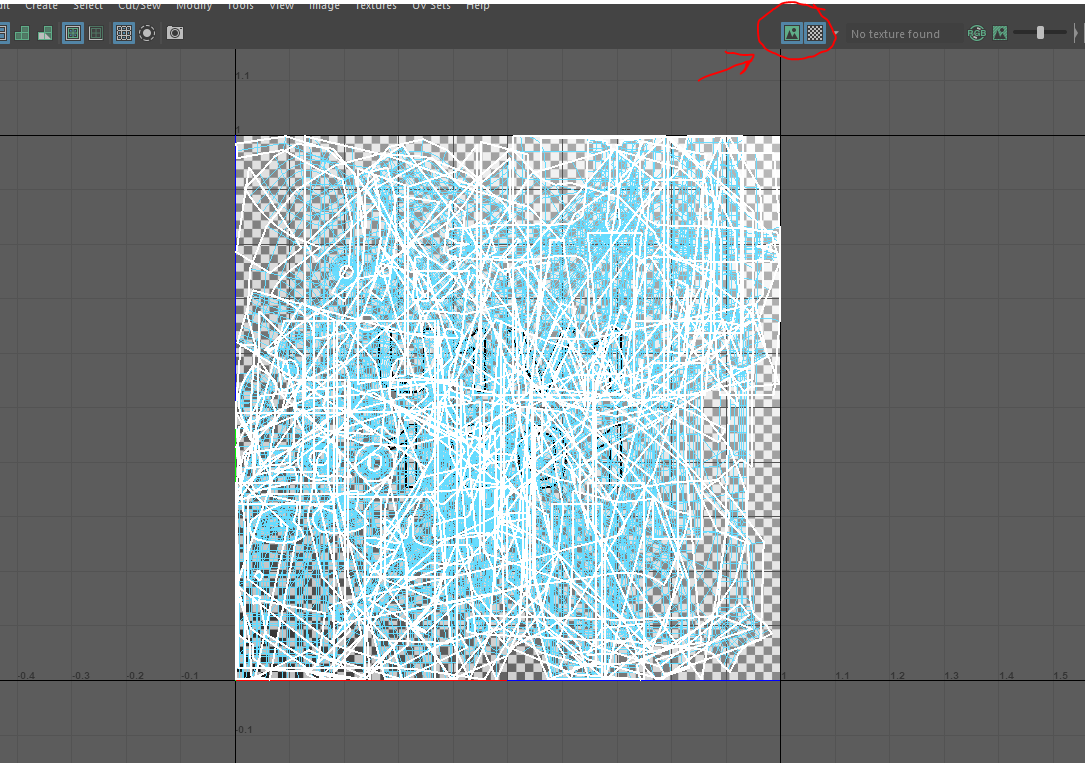
Quick tip: to check if all the UV shells are in a single UV tile, select all your geometry, and click the "Display image" and "Checker Map" buttons to the top right of the UV editor view window.
In MotionBuilder (I’m not going to give descriptions of these steps, as each will have a section in the lower part of this post):
- Check if the skinning and blendshapes are working correctly
- Create Groups
- Set up Cluster Shapes (if you are using joints for facial animation)
- Add Actor Face
- Set up Voice Device
- Set up Character Face
- Set up eye controller
- Create floor
- Map skeleton and Characterize
- Add extra objects to Character Extension (if applicable)
- Create Poses
You can see why it’s important to make a checklist ahead of time. There’s a lot of items here, and you only should do as many as your project needs. For example, if you’re not doing any facial animation, you don’t need to do steps 3 - 7. If your character doesn’t have any props or joints aside from the standard HIK set, OR you’re not going to be using the Story Tool at any part in your pipeline, you don’t need to do step 10.
You’ll also notice that I set up the assets related to the face first, followed by mapping the rest of the body. In my experience, face assets can cause the most issues, so I prefer to get those out of the way first.
Let’s get into it!
Step 1: Check blend shapes and skinning
Before you start doing anything, make sure your rig is gonna work. To check your skinning, grab your joints and rotate them around. They should deform in the same way they did in Maya.
To check your blend shapes, drag a Character Face onto your model with shapes from the Resource Browser.
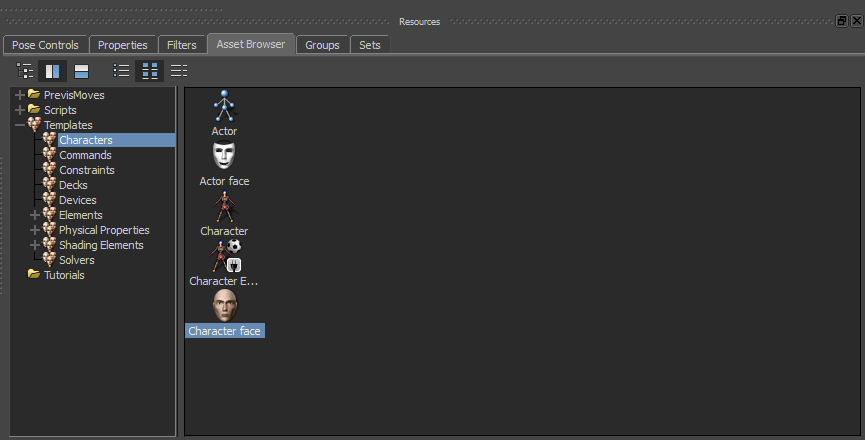
When you drag it onto the model, you should have the option to “Create” or “Attach to Model.” Pick “Attach to Model.”
Next, go into a shape, and enter a value for a random shape. You should see the shape reflected on the model.

Here, I've picked a random MotionBuilder shape and a random shape I made for YPR, just to check that the shapes imported correctly.
Some notes on creating blend shapes and targets for MoBu:
- No correctives! Correctives are set up with a set driven key in Maya – those set driven keys don’t carry over into MoBu. Very few constraints do, in fact. If you need correctives, your best bet is to retarget to a simple rig in MoBu, then, using Maya’s retargeting system, retarget to a more complicated rig with correctives.
- No shape masks! This caused me a lot of pain recently. Shape masks (i.e., when you paint blend shape weights so that only certain parts of the mesh are effected by the deformation) do not export from Maya 2019. Not to Unity, not to MotionBuilder. Luckily, unlike Maya, MoBu’s blend shapes are additive, which means that one will not overwrite the other. Yay!
- Targets must be created in Object-Space, not Tangent-Space or Transform-Space. You can tell because an Object-Space target will have a little orange swirl to the left of its name.
You should also rotate your character to be facing the positive Z-axis. If you don’t, MotionBuilder will throw a fit when you define the skeleton.
2. Create groups
I like to create my groups right away, so I can show, hide, make unselectable, and make untransformable different parts of the rig as I’m working. To do this, I’ll select whatever objects I want, then in the Groups tab of the Resources panel, I hit “Create”

I've created four groups here
The “Show” column controls whether or not the members of the group are visible. The “Pick” column controls whether or not you can select the members of the group (very useful). The “Trs” column controls whether or not you can move the members of the group.
3. Set up cluster shapes
Skip this step if your model’s face is only controlled by blend shapes. Cluster Shapes are different joint poses used by the Character Face. Think of this process like creating joint-based blend shapes. For more information on the Character Face asset, visit the MotionBuilder documentation. You define cluster shapes if you need to use joints in your facial animation. I’ll use them here because YPR has joints in his eyebrows and eyelids, as well as a jaw joint, which I’ll need to pose for both the Generic Shapes mapping and phoneme mapping (more on those later).
Anyway, to begin, start by clicking on the Character Face and, in the “Target Models” pane, clicking on the “Cluster Shapes Creation” tab. Select the joints you need to create a cluster for, and, holding down x or alt (depending on your hotkey setup), drag them onto the “Cluster Groups” dropdown, where it says “<Drop Cluster(s) Here>”.

“<Drop Cluster(s) Here>” will switch to “Cluster Groups.” Rename your group.

I’ve created my “mouth” Cluster Group. You’ll notice that I’ve added the tongue – which is a child of jaw joint – as well. Although it might make sense to you to make separate Cluster Groups for the jaw and the tongue, since the tongue is a child of the jaw, you want them to be together. If they’re separate, when the jaw is in a certain Cluster Shape, such as wide open, the tongue won’t follow, and will instead, hang in the center of the mouth. Instead, you should create both your tongue and your jaw poses in within the mouth Cluster Group.
Next, I’ll add all the mouth poses that I want by clicking “Add” to add a new pose and then renaming it:
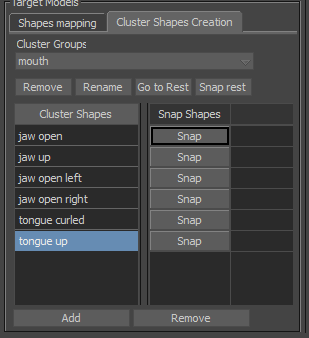
the tongue poses will be useful for lip sync -- instead of hand-animating the tongue, I can, for example, map a bit of jaw open and tongue curled to make the L phoneme.
After that, I simply transform the joints into the position that I want them to be for each shape, then press “Snap” next to the corresponding pose. Repeat this process for each mouth Cluster Shape.

Here, I create the jaw open Cluster Shape
If your model is unsmoothed, but it will be smoothed in the final render, I recommend getting the rotation/translation values from the smoothed model in Maya. Switch to local transformation mode (F5) or click the Reference Mode icon in the toolbar to the right of the viewer and select “Lcl”:

Once you’re finished with all the mouth Cluster Shapes, you should be able to click on the shape and the model will snap into that pose:

Here, I clicked on "jaw open right" to have YPR snap into that shape
Repeat this process (creating and defining Cluster Shapes) for each Cluster Group required by your project. For mine, I used the following:
- Mouth: jaw open, jaw up, jaw open left, jaw open right, tongue curled, tongue up
- R Eyelid: closed, wide open, squint, upper lid down
- L Eyelid: closed, wide open, squint, upper lid down
- R Eyebrow: happy, sad, surprised, scared, furrowed, angry
- L Eyebrow: happy, sad, surprised, scared, furrowed, angry
For eyelids and eyebrows, if you want the poses to be symmetrical, you can pose them both, then snap the respective shapes. So, I could pose rotate the right eyelid and the left eyelid closed at the same time, snap the closed Cluster Shape in the L Eyelid cluster group, then switch into the R Eyelid cluster group, and snap that closed Cluster Shape as well. This saves a bit of time. Just remember, a pose will only be saved on the joints within a Cluster Group, and if you click on a Cluster Shape, the model will snap into the pose, so any unsnapped pose that might be on the model will be lost.
4. Add Actor Face
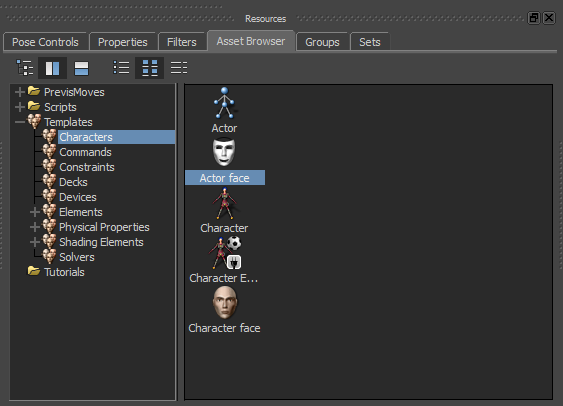
In the Asset Browser of the Resources Window, click and drag an Actor Face onto your model. Click “Set as Source.” We don’t need to do anything else with the Actor Face – it’s used for facial motion capture retargeting and keyframe facial animation – but it’s useful to have one in the scene from the start. For more information on the Actor Face, refer to the MotionBuilder documentation.
5. Set up the Voice Device
Skip this step if you’re not using the Voice Device to do automatic lip sync. I have a very detailed tutorial here on setting up the Voice Device, so I’m not going to repeat the full thing. You should follow it up to step 6. Please note that, in that tutorial, I make custom blend shapes for each phoneme. In this one, I’m okay with a more generic look to the lip sync, so I’m going to be combining blend shapes and cluster shapes for each phoneme. The important thing to understand for this tutorial is that the Voice Device creates a new Expression in the Character Face for each phoneme, which you then define like you would any other expression.
Anyway, assuming you’re going to use the Voice Device and have read that tutorial, here’s what to do inside of MotionBuilder to be able to proceed with the next step:
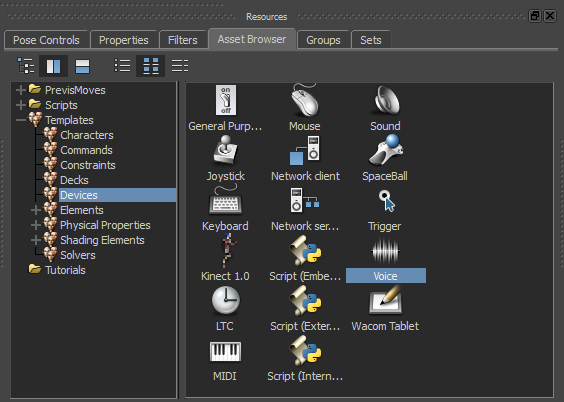
In the Asset Browser of the Resources Window, click and drag a Voice Device onto your model.
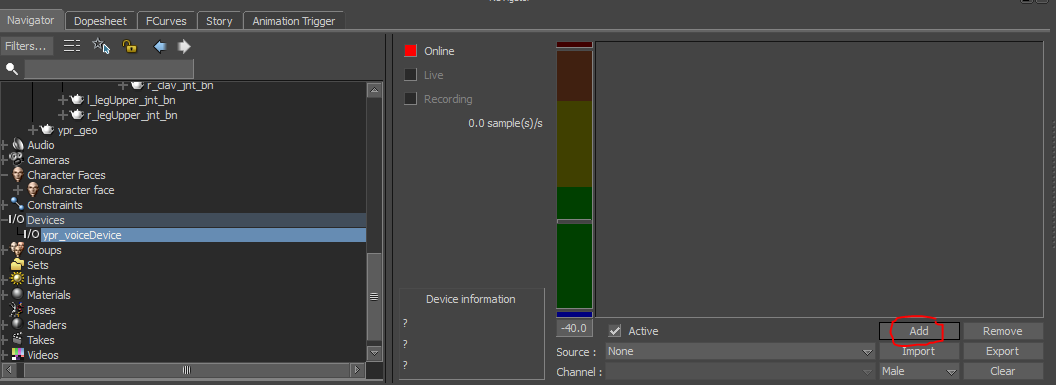
Click on the Voice Device in the Hierarchy, and in the lower right corner, click the “Add” button:
Up pops this cute little window, the Voice Parameter Selection window, where you select all the phonemes that you want to define in the Character Face. Ctrl + Click all the ones you want, then click Ok. For this project, I’m using AE, AO, AX, Breath, FV, IY, KG, L, M, N, OW, PB, S, Silence, SZH, TD, UH, UW. Humans aren’t amazing at telling the different phonemes, so you can get away with relatively few and still have an appealing speaking animation, especially if your character is stylized.

Your Voice Device window in the Navigator should now look like this:

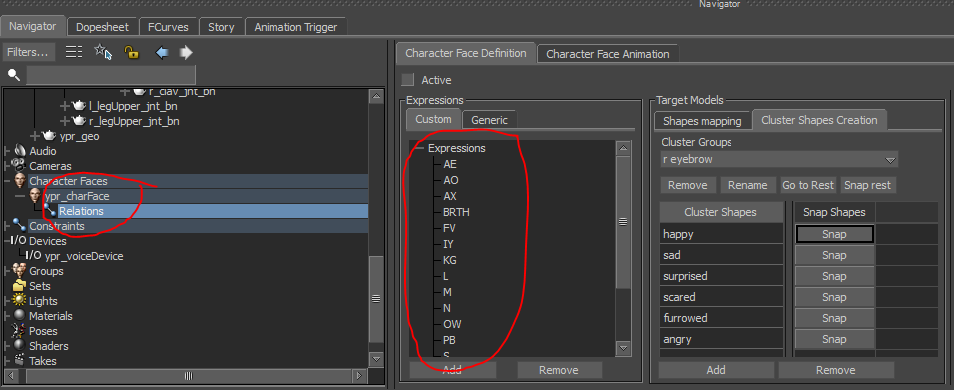
Click on the Character Face in the Hierarchy, and navigate to the “Custom” tab in the Expressions window. You should see that an expression has been created for each phoneme. You should also see that a Relations Constraint has been created in the Hierarchy, under the Character Face
Click on the Relations Constraint. Connect each phoneme from the Voice Device node to the empty connection in the shape Multiply node, as shown below:
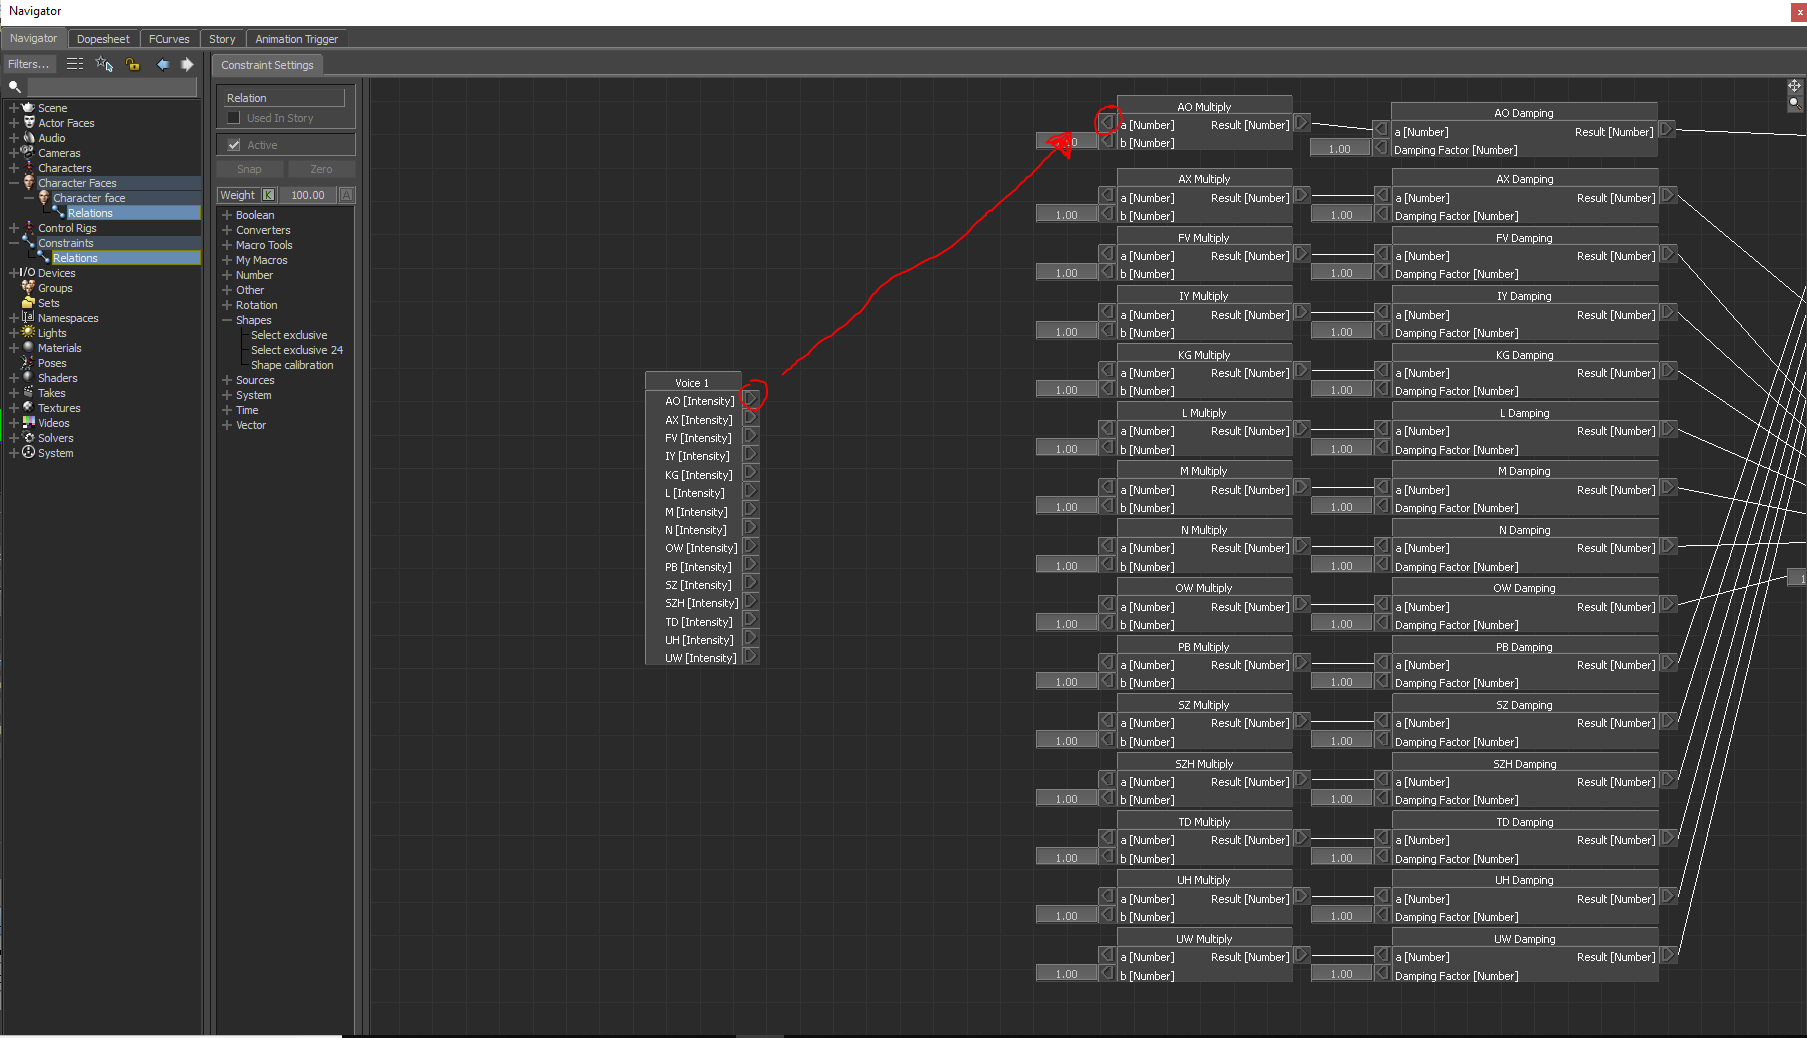
Your final result should look like this:
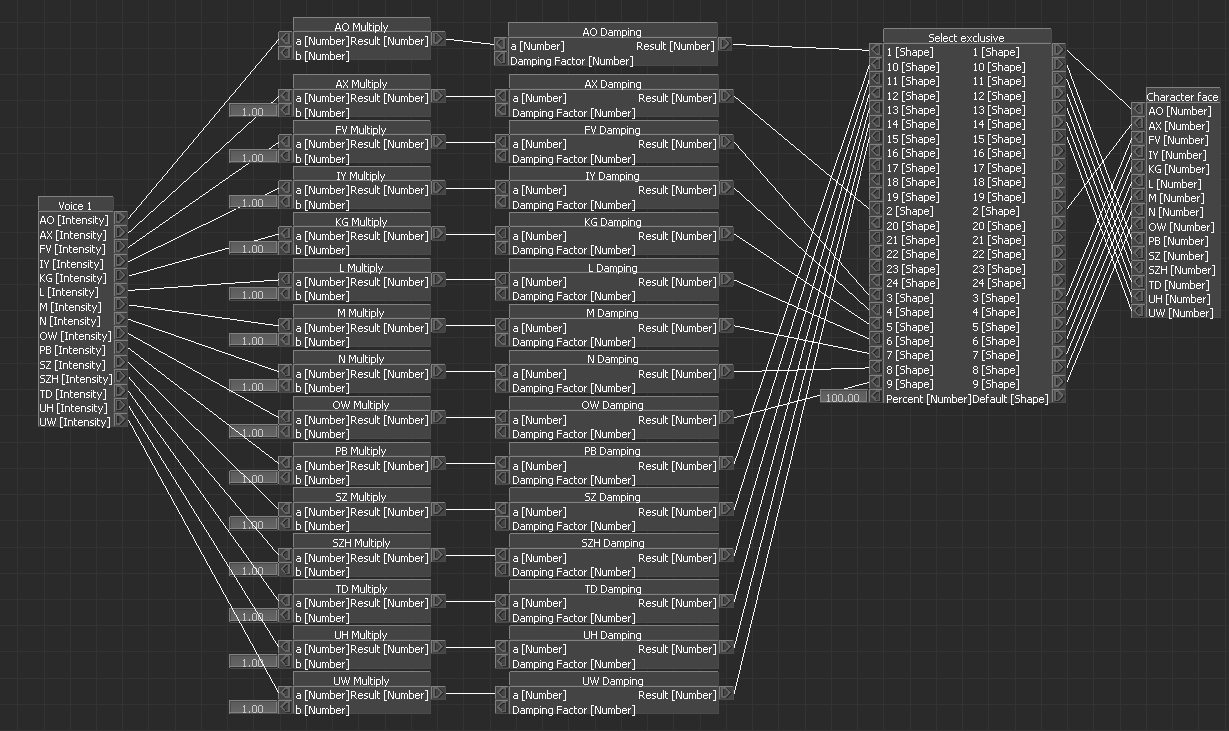
Now, the expressions defined by the Character Face will be triggered when a phoneme is identified by the Voice Device. For further tweaking the Voice Device and more detailed set up, refer to the tutorial linked above.
6. Set up Character Face
Now that your Cluster Shapes are defined and your Voice Device expressions are present in the Custom Expressions Panel, you can set up the rest of the Character Face asset. Doing this allows you to use the Character Face to animate the face, as well as map your blend shapes or cluster shapes to MoBu’s Generic facial expressions, which is required for facial motion capture. Essentially, you’re defining the arbitrary blend shapes and joints that you created in your rig as a facial expression that MoBu can understand, and will allow you to animate.
There are two types of Expressions in the MotionBuilder Character Face: Generic and Custom. Generic Expressions are the default expressions MoBu figures you’ll need for facial animation. They’re also the Expressions you’re required to define to perform facial motion capture retargeting. I’m not doing facial mocap on this project, but I’m going to define them anyway. Custom Expressions are extra Expressions that the user (you) creates, or phonemes that are created by the Voice Device.
Let’s start with the Generic Shapes. Click on the Character Face in the Hierarchy. In the “Expressions” pane, click on the “Generic” tab, and in the “Target Models” pane, click on the “Shapes Mapping” tab. If you click on the “Models with shapes” dropdown, you should see all your models with blend shapes, as well as all the Cluster Groups you created in Step 3.
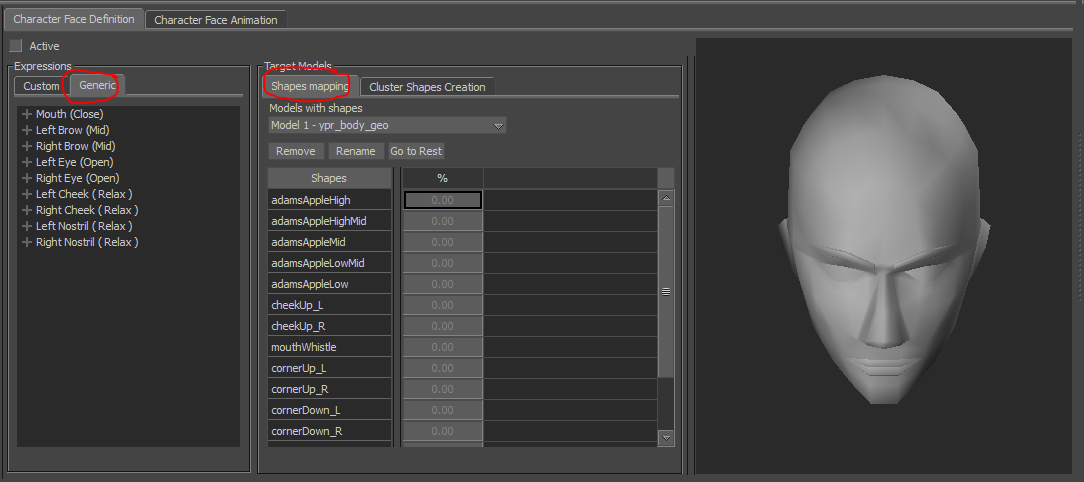
Expand the Mouth (Close) Generic Expressions Group, then click on one of the Expressions (I’ll do Open). When you click on an expression, the Shapes are no longer greyed out.
I’ll select my “mouth” Cluster Group from the “Model with shapes” dropdown, then, with the Mouth Open Generic shape selected, dial my jaw open Cluster Shape up to 100%. See below:

For some shapes, you’ll need to combine model blend shapes with a Cluster Shape. I’ll demonstrate how to do this on the Mouth Square Generic Shape. I’ll dial the jaw open Cluster Shape up to 70%:

Next, I’ll select my ypr_body_geo from the “Model with shapes” dropdown. This deselects the Mouth Square Expression. I reselect it, and the mouth pops back into the mapping I’ve already set (jaw open 70%). Then, I’ll navigate to the cornerUpL and cornerUpR blend shapes in the “Target Models” pane, and turn them both up to 50%:

Go through the Generic Expressions, mapping your blend shapes and cluster shapes.
Next, we’ll do the Custom Shapes. Switch to the “Custom” tab in the “Expressions” pane. It should be blank, or, if you’re using a Voice Device, populated with the phoneme Expressions.
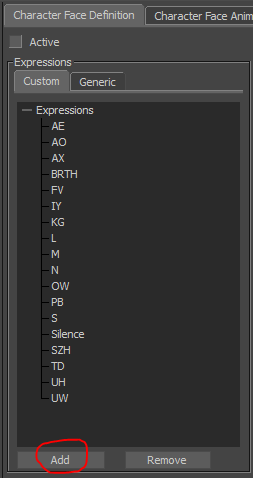
Click the “Add” button on the lower left. Add however many Expressions would help you with your project. It could be useful to add Expressions for additional blend shapes or full-face expressions. I’m going to add some for YPR’s Adams Apple.

Map these Custom Expressions in the same manner that you did with the Generic ones.
7. Set up eye controller
I’m not going to go into detail on this step, because I wrote another tutorial on setting up the eye controller here. Scroll down to the section titled “Method 3: Chain IK.”
8. Create floor
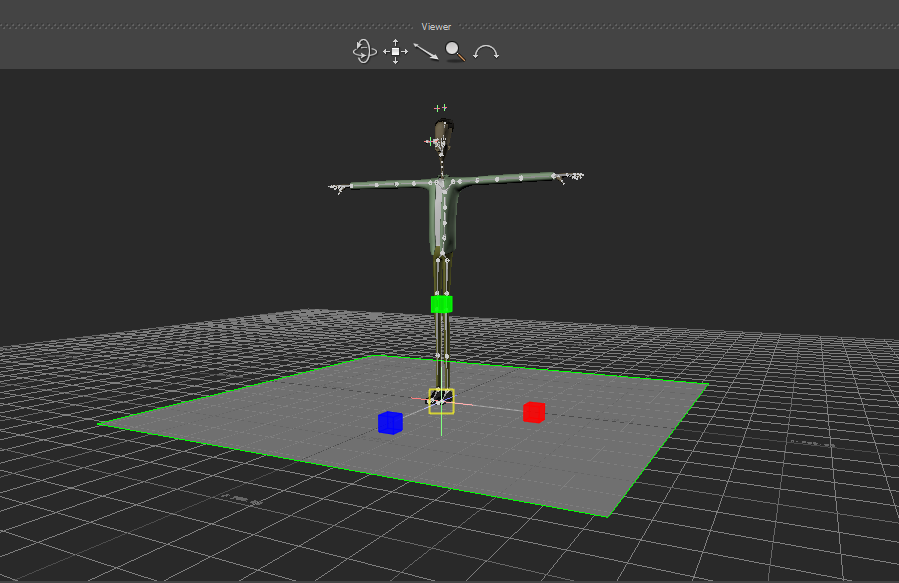
When retargeting, it’s very useful to have have a floor defined so that your character’s feet don’t go through the floor. We’ll create the floor plane now. From the “Elements” section of the Asset Browser in the Resources Window, select a plane, and drag it into the scene. Right click on the plane and select Zero > Translation/Rotation from the pop-up menu.
9. Define Skeleton and Characterize
Now that the facial mapping is done, we can map the rest of the body. This step allows MotionBuilder to retarget movement from other defined skeletons to your character – the whole reason you’re using the software, right??
I liked to do this step with the geometry hidden or unselectable. The first step is to, in the Character Controls window, under “Define”, click “Skeleton”.
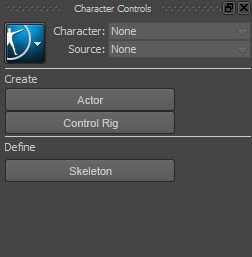
MotionBuilder will double check that you want to actually define a skeleton. Click “Define.” The Character Controls window will now display this mapping tool:

The concept is to define certain bones in your character’s skeleton as this standard set of bones. If you used a naming template (like HIK), you can automatically map it by clicking this button:
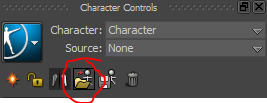
I’m an imbecile, so I did not do that. Looks like I’m defining by hand! To define a bone, select it in the Viewer or the Hierarchy, then right click it’s corresponding bone in the Character Controls window and click “Assign Selected Bone.”

If it’s a happy definition, MoBu will display the bone as green in the Character Controls window. If it’s sad, MoBu will tell you the problem in the “Status” bar.
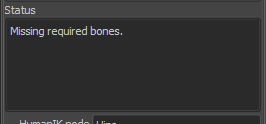
no kidding
The downward facing arrows indicate an area that can be expanded to define more bones. You can define extra spine bones, finger and toe phalanges, collarbones, and extra neck bones. You can also define roll bones on the upper and lower arms and legs.

When you have all the required bones, the “Status” bar will display the message “Characterization is valid.”
The next step is to define the floor plane as the floor. In the Hierarchy, under Characters, you should now see the Character that you just created. Click on it, and open the “Character Definition”. It should look like this:
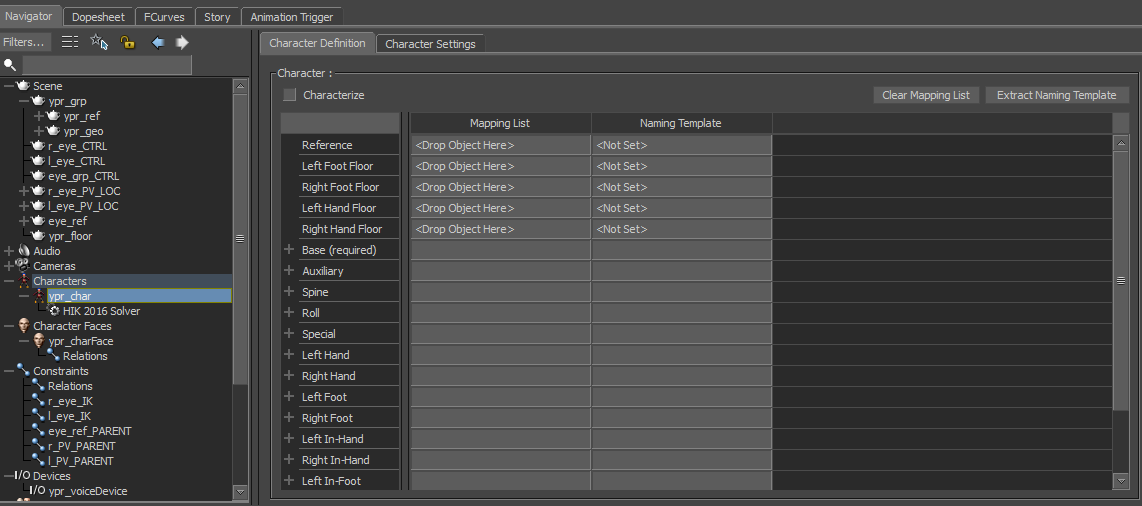
Click on the floor in the Hierarchy, and, holding x, drag it into the “Left Foot Floor” and “Right Foot Floor” slots:
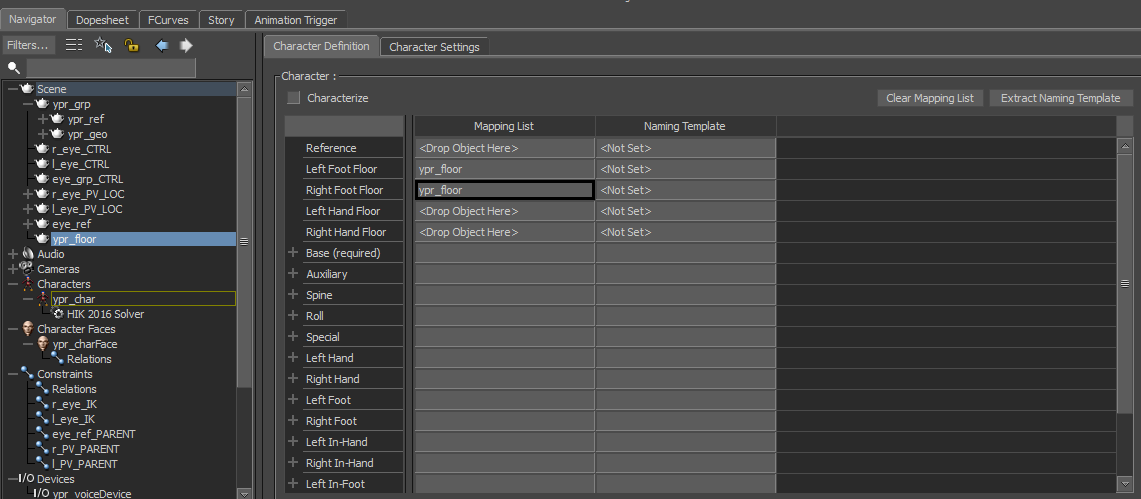
If your character’s hands will be on the floor at any point, it’s a good idea to drag it into the “Left Hand Floor” and “Right Hand Floor” slots as well.
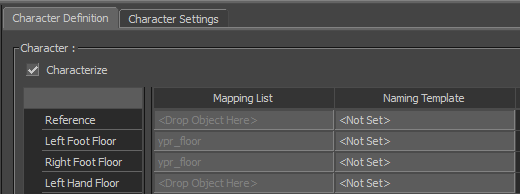
Next, tick the “Characterize” Box. MoBu will ask you to select biped or quadruped. Select the relevant option. Now, your mapping will be in-editable. If you need to edit it, you much untick the “Characterize” box.
Next, reposition the floor contact to line up with the feet of the model. If you zoom in on the feet, you should see six blue and six green cubes arranged around the feet:
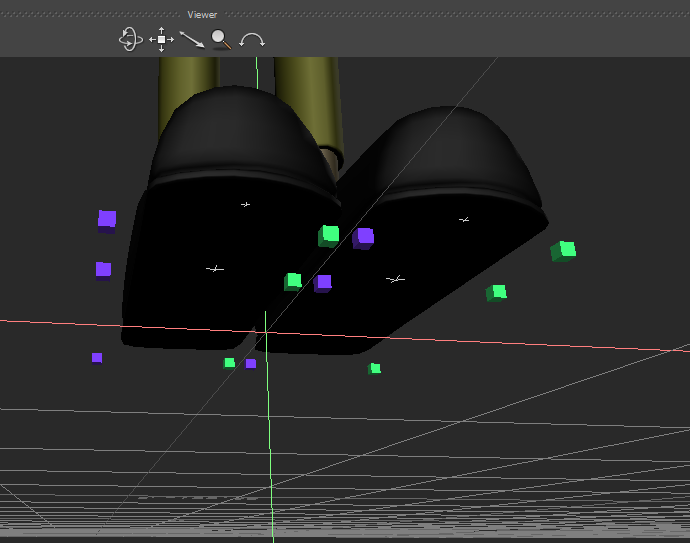
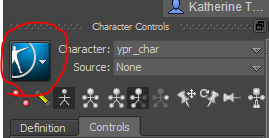
If you don’t see them, click on the blue box in the top left of the Character Controls window, and select Show/Hide > Floor contacts.
Reposition the cubes so that they fit the shape of the model’s feet:

Finally, create a Control Rig. The Control Rig is just a set of controls that MoBu creates on a characterized skeleton to allow you to edit it. In the top of the Character Controls window, from the “Source” dropdown, select “Control Rig”.

MotionBuilder will ask you what type of Control Rig you’d like to create. I always pick FKIK. After you create the Control Rig, it will appear on your character’s skeleton and in your Character Controls window:

10. Create Character Extension
By now, you might have spotted the issue of joints that do not correspond to any joint in MotionBuilder’s mapping system – prop joints, facial joints, etc. This is where the Character Extension comes in. A Character Extension allows you to retarget or paste poses and motions to joints outside of MoBu’s standard mapping set – very useful for more complicated characters. If you’re still fuzzy on why it matters, read it about in the MotionBuilder documentation.
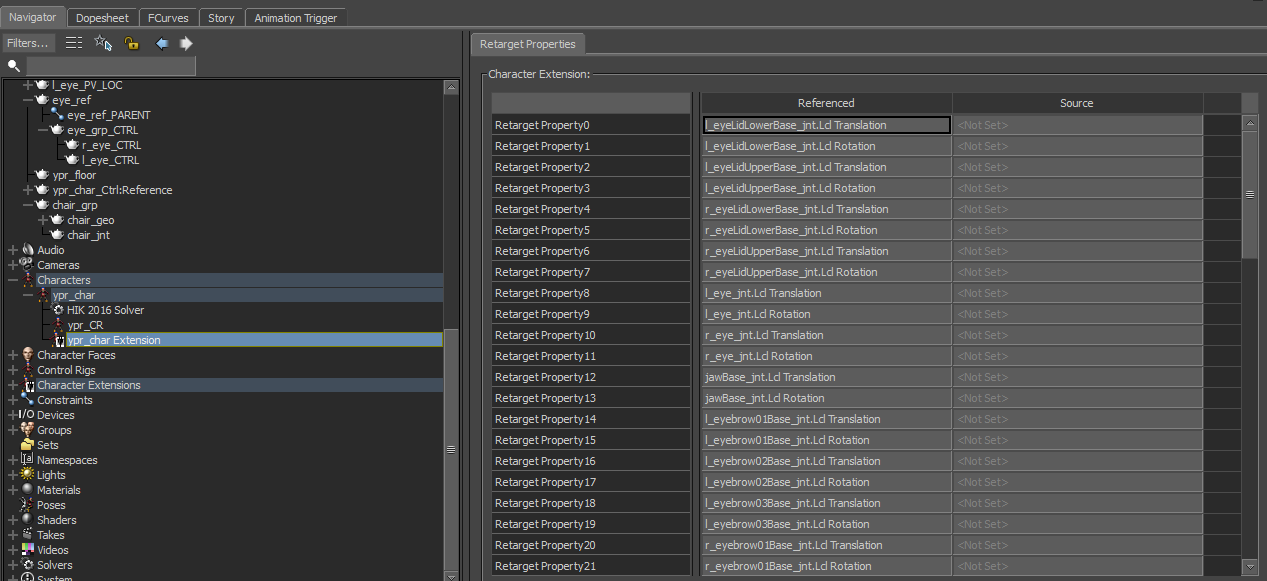
YPR has a chair that he interacts with all the time, so I’m going to add that to the Character Extension. I’m also going to add all the facial joints – eyelids, jaw, tongue, and eyebrow – and the eye controller objects. To begin, right click on the Character in the Hierarchy, and click “Create Character Extension” A Character Extension will appear in the Hierarchy below the Character.
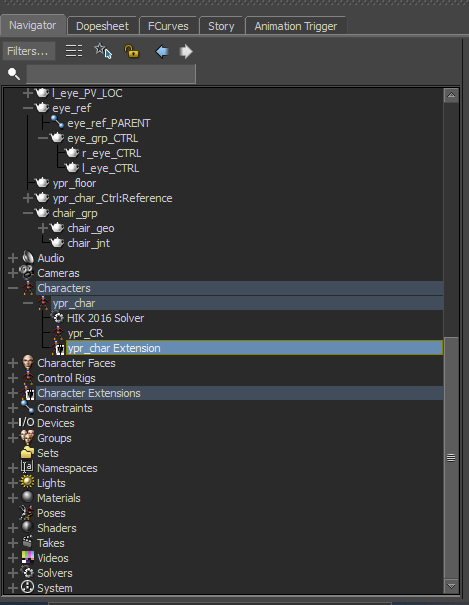
Next, select all the objects you’d want in the Character Extension, and click+drag them onto the Character Extension. Click on “Add to Character Extension” when it pops up. Now, when you click on the Character Extension in the Navigator, all your objects should be listed.
11. Create Poses
This step is quite optional, but will save you time animating, because you can paste a pose onto some or all body parts. Use the Pose Controls window to create as many poses as you want. I always do them for at least the hands. I’ll demonstrate on the finger pointing hand pose.
First, in the Character Controls window, I switch the Source to the Control Rig so I can manipulate the rig:

Next, I’ll move the fingers into the pose:

I position the camera in a way that clearly shows what the pose is. Then, I click the green plus sign:

This creates a new pose, which you can rename to your liking.
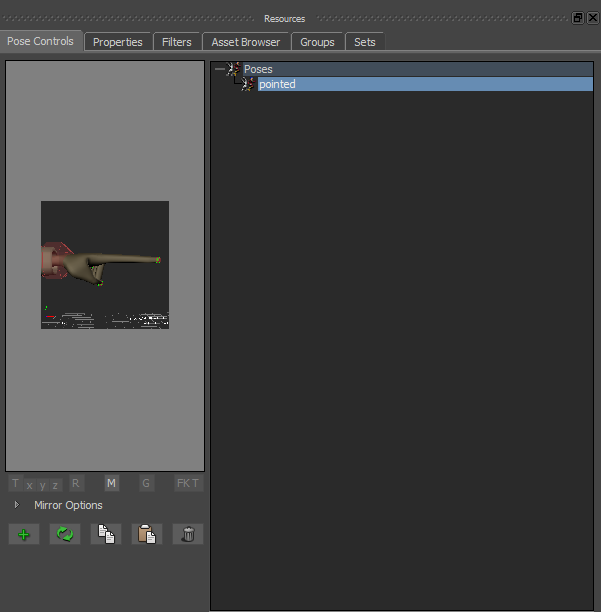
Repeat this process however many times you’d like. You don’t need to do the same poses on the other side, because you can mirror a pose. For a thorough guide to using pose, visit this Mocappys post. The section on using poses is near the end.
Conclusion
That’s my checklist for setting up a character to receive mocap in MotionBuilder. Hopefully this saves you time and gives you a jumping off point for more complicated characters!