Character Setup for Unity
25 Jul 2019
This post isn’t going to a tutorial in the way that my previous posts have been. Rather, it’s going to be some advice on how to approach bringing custom animations and characters into Unity, based on my past couple of years experience working on projects that utilize the (Motionbuilder) - Maya - Unity pipeline, and I’ll try to update this post with new considerations that I discover!
To utilize the Unity animation system with as few hiccups as possible, it’s important to understand the necessities of your project before you start the rigging process. The Unity animation system (a.k.a “Mecanim”) has many features that you may or may not need, and it’s important to know which ones you’ll need to utilize ahead of time so that you can plan ahead with your rigs and animation methods. This will become important when we discuss the Unity Avatar further down this post. Additionally, there are many common rigging tactics that are not suitable for use in Unity, and it’s important to be aware of the engine’s limitations so you can strategize the best rig possible. It’s better to build things right the first time, with lots of testing along the way, then to tell yourself “I’m sure it’ll work” and waste your time. I’ll get off the soapbox now.
Additionally, it should be noted that while I reference Maya, much of this information should carry over the Blender, 3ds Max, etc.
Sidebar: If you’re looking for a big-picture overview of a game rig (and some vintage Maya viewport action), I really like this talk by Judd Simantov on the rigs for the characters in The Last of Us. Obviously, the rigs are really tricked-out because they’re for a AAA game and have some features that aren’t supported by Unity’s out-of-the-box animation system, but you can see how they work with the constraints of a game engine while still making the characters expressive – they get really far on joints.
Humanoid Avatar
If you’re character is humanoid, decide whether or not you’re going to use Unity’s Humanoid Avatar before you begin rigging. Ask yourself these questions:
- Do I need to be able to retarget animations that I’ve imported from other characters to this characters (e.g. I’m planning on creating one animated character and applying that animation to all the characters)?
- Are my animations coming from a separate asset than my rigged model (e.g. I bought a motion pack from the Asset Store)?
- Do I/my animation programmer need to be able to use Unity’s IK system (anything involved in calling the OnAnimatorIK method, such as foot/hand IK controlling, controlling the LookAt position of the head)?
If the answer to any of these questions is yes, you should use the Humanoid Avatar and read the documentation in the Unity Manual (if you don’t need to do these things, you’ll use the Generic Avatar). You should also read up on the Rig Tab in the asset Import Settings. The Avatar essentially is Unity’s representation of a human, and you map your own character’s bones to the Avatar to tell Unity how to retarget animation to your character.
If you’re planning on using the Avatar, you need to have at least the following bones (you don’t necessarily have to skin anything to them, but they need to be present in your skeleton hierarchy):
- Hips
- Spine
- Head
- Upper Arm (L & R)
- Lower Arm (L & R)
- Hand (L & R)
- Upper Leg (L & R)
- Lower Leg (L & R)
- Foot (L & R)
You can also have the option of including:
- Chest
- Upper Chest (sometimes referred to as a lower neck/neck base joint)
- Neck
- Toes (as in, one toe bone, not individual toes)
- 3-joint chain fingers and thumbs
- Jaw
- Eyes (L & R)
- Shoulder (L & R, sometimes referred to as a clavicle joint)
Now, this doesn’t mean you’re limited to these bones. For example, I like my characters to have eyelid bones, which aren’t included in the Avatar mapping. In the importing section, I’ll discuss adding extra bones to an Avatar setup. One thing to note if you’re planning on using the Avatar for animation retargeting: you cannot retarget blendshapes. Additionally, the character you’re retargeting from also needs to have a Humanoid Avatar definition.
Rigging
Anyway, I’m going to start with a list of common features of character rigs that do not carry over into Unity (as of Unity 2019):
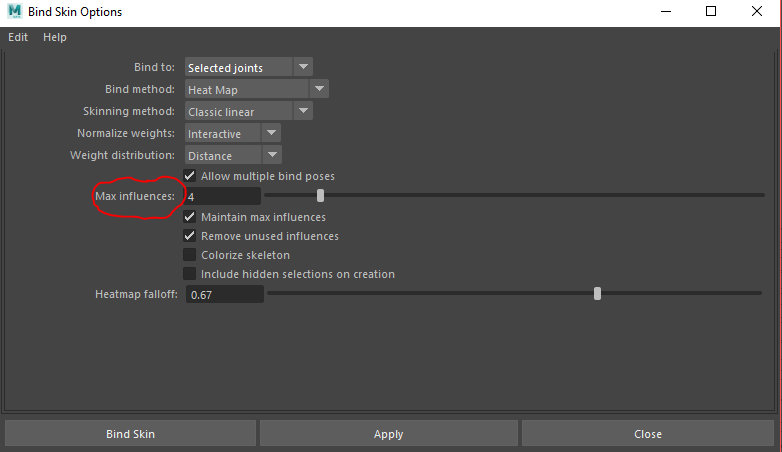
Greater than 4 joint influences per vertex: Unity only supports 4 joints-per-vertex. Make sure you adjust your Mac Influences and that the “Maintain max influences” box is checked in your Bind Skin Options.
Parent Constraints: all elements of the rig need to be in the same hierarchy! If you have extra joints to control a dress, for example, make sure to put those under your root joint. If you have eyelid or eyeball joints, make sure to put those under the head joint in your hierarchy.
IK spline and other fancy solvers: You can have an IK spline used in your animation process, but make sure that the animation is baked to the bind joints before you export. If you have a stretchy tongue or something – same thing. Make sure it’s baked to the bind joints before proceeding.
Certain skinning algorithms: In the past, I’ve had hit or miss success getting Heat Map and Geodesic Voxel to import into Unity. If you want to use these algorithms, I recommend skinning, putting some stupid animation on the joints, and immediately importing it into Unity so that you can check.
Non-blend shape or skin deformers: Cluster deformers, squash deformers, Delta Mush deformer, etc. Stick to blend shapes and skins.
Corrective blend shapes: But didn’t I just say blend shapes are okay? Ha ha! Not all of them! This is where understanding the specifications of your project comes in. If, in Unity, you or your animation programmer is planning on either using Unity’s Avatar system to a) interpolate between animations, do IK controlling, etc; b) re-target animations from another character; or c) import the model separate from the animations, corrective blend shapes are not a good idea because the connection between the rotation of the joint and the envelope of the blend shape will not be preserved. Remember, Unity simply converts every joint into a Game Object. However, if you’re planning on importing an animated model and only using the animation that is on that model, you can go wild with corrective blend shapes and then just bake them. If you really want a corrective, you can drop $15 on this asset.
Unlike a film rig, performance is important for a game rig. If you’re particularly concerned about performance with your rig, you might consider an entirely joint-based facial rig, like the one that I have on Greer, below.
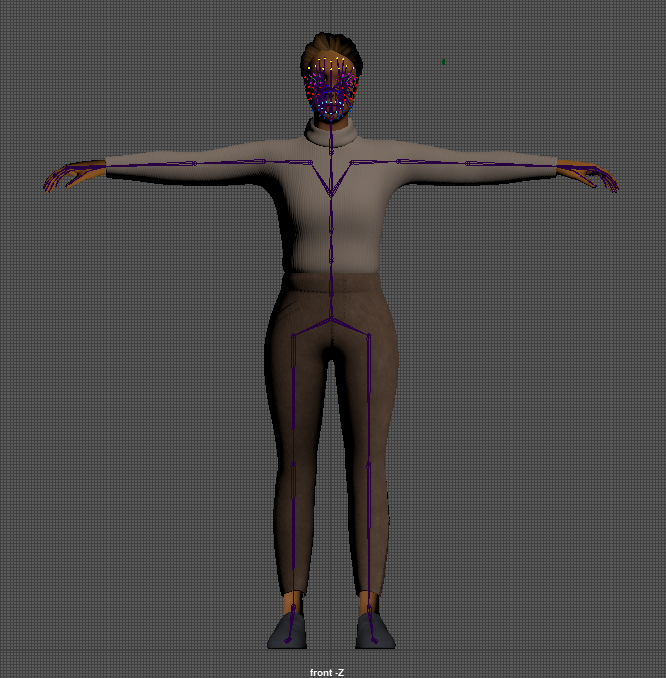
Greer, who was the main character in a VR experience I worked on with Anna Henson, Catherine Luo, Alyss Weissglass, and Andrew Chang (Catherine made Greer's model).
Unity’s default rotation order is ZXY. Unlike in Maya, you cannot change the rotation order on a GameObject. However, your animation should be fine if animated on joints with a different rotation order.
Animation
At a very high level, Unity’s animation system is built for people trying to play different animations, on the same character, at different times. For example, you might have Unity play the “jump” animation when the player hits the spacebar. A character in a game may have dozens or even hundreds of animations that get triggered, masked, blended, etc. according to input from the player, the environment, props, player health, or any number of other variables that impact the character’s movement. You can also have a character that only does one animation, on a loop, forever. Whatever the animation requirements of your project, the foundational building block of your character’s movement is an Animation Clip. It’s the 1x1 Lego of Unity’s animation system (except not really, because you can mask out parts of an animation. Whatever, I like the metaphor).
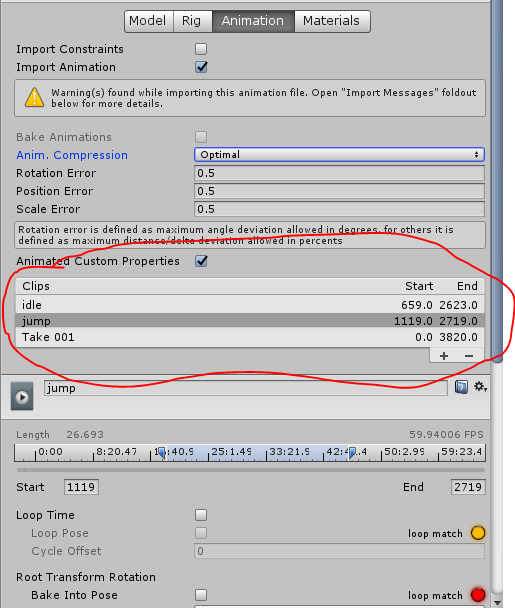
Animation clips
You can create Animation Clips in Unity. However, the reason you’re here is that you’re doing complicated character animation that would be a nightmare to do in Unity, and you need to know how to get that from your animation software into Unity.
There are ways to set up your animating process that make it easier to create these Animation Clips. Usually, if you’re animating for a film, you would have all your animations in separate files. If you’re planning on defining your skeleton with the Humanoid Avatar, you do this and then import all animations as separate assets (in fact, you can just import the animated skeleton without the mesh), although it’s easier to combine them all into one file before export.
If you don’t want to deal with Avatar configuration, you need to have all your animation in the same asset, which means exporting them from the same Maya file. If you’re using Motionbuilder, you can combine all of your animations into the same take using the Story Window, or if you’re using Maya, you can use the Trax Editor. Both of these are NLEs with which you can combine animations from other files. You can also just do all of your animation on the same take!

Here's an example of what your Story Window/Trax Editor might look like. These are all loops, which is why they overlap (see below).
So, you might have a t-pose from frame 0-100, an idle loop from 110 - 510, a jump from 550 - 600, a walk cycle from 650 - 700, a run cycle from 710 - 750, etc.
No matter whether or not you’re importing single animations and retargeting them or if you’ve compiled all your animations together into one take, it’s a good idea to have the animation start with a t-pose (you can just key the first frame to be a t-pose). If you’re using the Humanoid Avatar, it must start with a t-pose so that the skeleton is defined with proper orientations.
It’s also a good idea to consider your transitions while creating your animation. Unity can blend animations when it transitions between states and, within states, between motions, but if an animation needs to be loopable, it’s always better to loop it in the animation software. If you’re hand keying it, you can make sure the beginning and end of the cycle are exactly the same, but if you can’t do that, cut some frames off from the end and crossfade them with the beginning:

Creating a loop
Exporting
Once you’re happy with your animation, you need to bake it to the joints. Select every joint in the hierarchy and go to Edit > Bake Simulation. If you have blend shape animation, select the mesh with blend shapes as well and make sure “Shapes” is checked in the Bake Simulation Options. You can read more about the Bake Simulation Options in the Maya documentation.
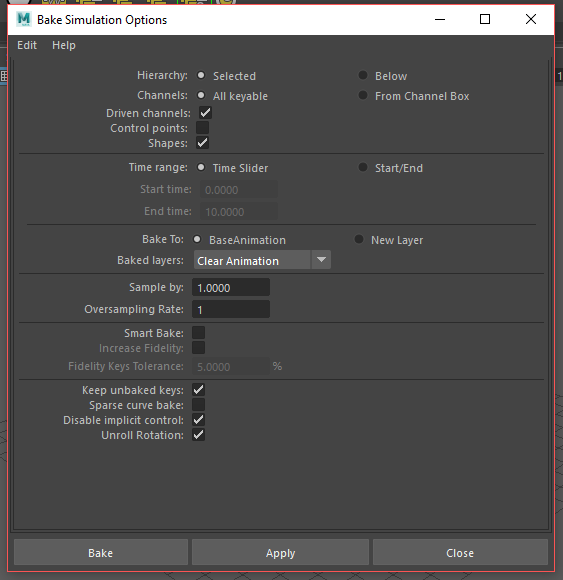
Check the Driven Channels box if your joints are controlled with constraints. Check the Shapes box if you need to include blend shape animation.
Select everything you want to Export (i.e. your character geometry and your skeleton) and click File > Export Selection, and select FBX from the File Type dropdown (if you don’t see FBX, you may need to load the FBX Export plugin). Read more about the FBX export options in the Maya documentation, but to save you the headache: to include your textures, check the “Embed Media” box.
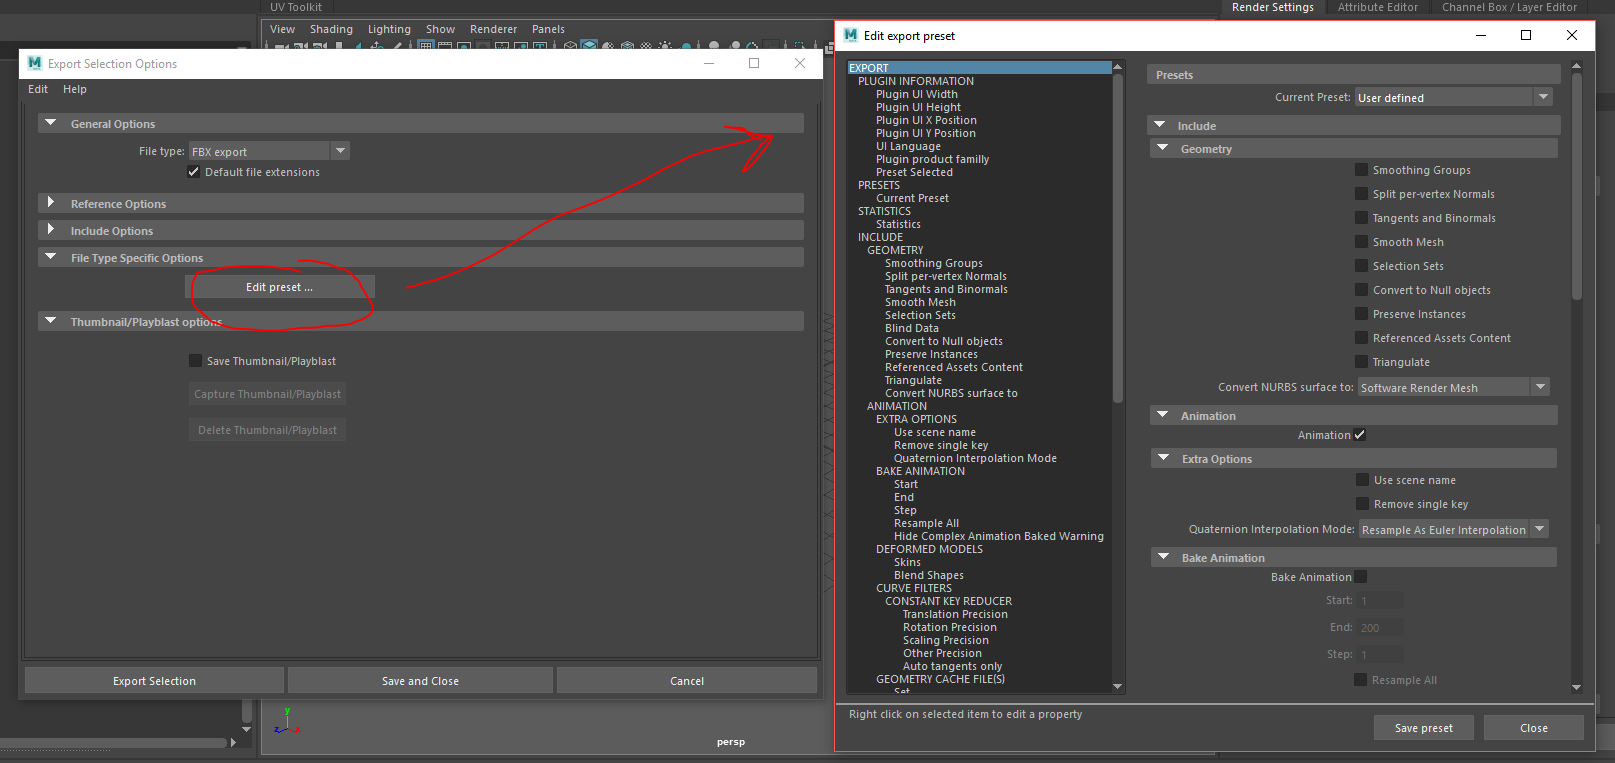
Hit the "Edit Preset" button to change the FBX export options.
You might want to use the File > Send to Unity feature, or you may want to drag-and-drop your .mb or .ma file into the Unity Project Window. I don’t recommend either of these methods because you have less control over the export options (besides, all Unity does it open the Maya file and export an FBX automatically. It’s not that special).
Importing
Import your FBX into Unity. To find out more about out more about importing your character, you should read this page in the Unity documentation, and if you need to, set up your Avatar as described. Next, in the Animation tab of the import settings, divide your animation into clips.
The following are a collection of tips on solving problems with your animation in your character’s Import Settings:
Extra joints don’t have animation on them: If you have a joint that’s not included in the Avatar definition (a prop joint, eyelids, a tail), you can add its animation by performing the following: in the Animation Tab, expand the “Mask” section. Select “Create from this Model” from the Definition drop down. Then, under the Section, tick the box next to your extra joints.

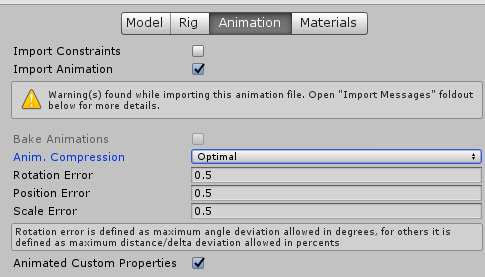
Animation doesn’t “look the same”: When you import animation with a high number of keys (like mocap, which usually has a key every frame), Unity automatically applies some Animation Compression. You can read about it in more detail on Nicholas Frechette’s Blog. Anyway, you can turn it off, but that’s not recommended. I recommend you reduce the Rotation Error and Position Error until you get something satisfactory.
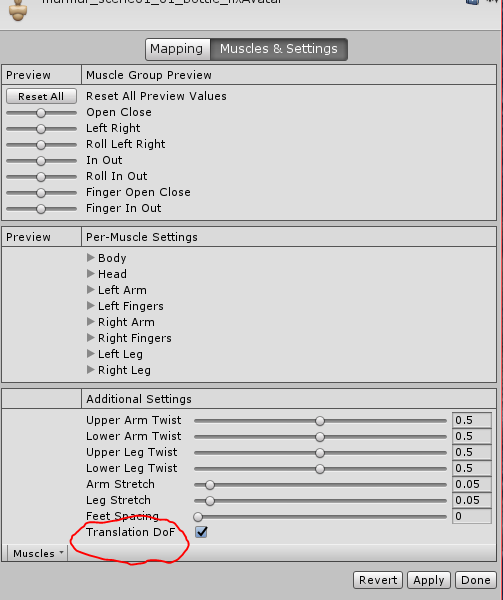
Additionally, you should know that when you define the Avatar, Unity by default removes translation data on all the joints except the hips. Usually this is fine, but can lead to subtle differences in the animation (especially mocap. Usually a keyframe animator would not use translation). I once had a character that leaned on a walker. With the Generic Avatar, it looked fine, but with the Humanoid Avatar definition, the hands no longer made good contacts with the handles of the walker because the translation data had been removed. To get Unity to retain the translation data on joints in the Avatar definition, go to the Muscles & Settings tab of your Avatar, and tick the Translation DoF box at the bottom:
Arm and Leg flipping: Before you cry gimbal lock, check and make sure that the first frame of your animation is a t-pose. If it’s not, when you define the Avatar, Unity will think that the non-zero rotations of your joints are the t-pose, leading to all sorts of problems. You can also force your character into a t-pose using the “Enforce T-Pose” button in the Avatar definition pane.
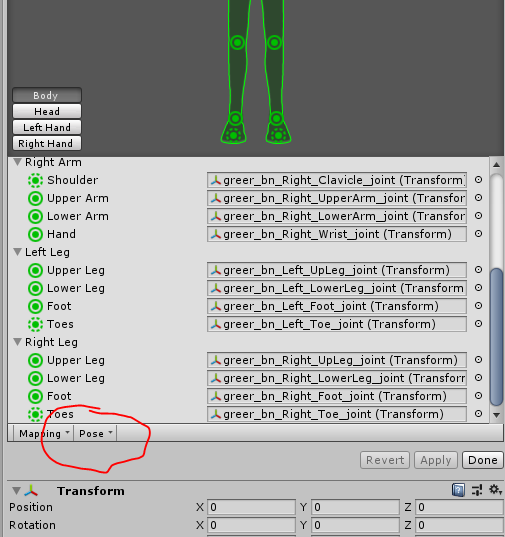
Select "Enforce T-Pose" from the Pose drop down menu
Skinning looks bad or “crunchy”: First of all, sometimes this look is due to the mesh not being smoothed. If a model was smoothed in your modeling software, you’ll need to make sure you export Smoothing Groups and properly set up the normals. Look at this information on the Model Tab to troubleshoot issues with the geometry.
If you skinned your model with 4 Max influences, the skinning should not look different than it did in your animation software, but Unity’s default settings might be jacked up. Go to Edit > Project Settings > Quality and make sure that “Blend Weights” is set to your desire number of joints-per-vertex influence. If you were on the “Very Low”, “Low”, “Medium”, or “High” preset, it automatically sets them to 2.

That’s all for now! Once you’re import settings are squared away, the next step is to set up the Animation State Machine. Even if that’s your programmer’s job, it’s useful to read that documentation so you can understand how all the animation clips you make will work together. I hope this helped you avoid issues and troubleshoot your own characters and rigs!