MotionBuilder Eye Controller
09 Jul 2019
An eye controller that allows you to manipulate the character’s look-at point is a bog-standard feature of any rig:
If I’m just doing one or two shots, I’ll do my body/face mocap re-targeting in Motionbuilder, bake it, send it to Maya, and set up my eye controller in Maya. However, for work recently, I was re-targeting a huge number of shots to the same rig, and I didn’t want to have to set up an eye control for every single shot. (Also doing all the animation in MoBu and then just the eyes in Maya mars an otherwise beautifully flowing pipeline. Yick).
So, I decided to make an eye controller in the characterization file so that every re-target would have the eye controller on the rig. (Side note: by “characterization file,” I mean the file with the character in a t-pose, with the skeleton defined, the floor defined (if applicable), character extensions added, etc – basically, the file that is all ready for mocap).
In this post, I’m going to go through two different methods for making an eye controller in Motionbuilder – aim constraints and chain IKs – and discuss which one I prefer and why. I wanted to make this post because the Internet abounds with various Maya tutorials, and often, I find myself extending techniques from Maya into Motionbuilder. However, this is an instance where the typical Maya way of doing things does not work well, and there’s a better method for Motionbuilder.
For the tutorial, I’ll be using Chad, which is a character from a game I worked on with Peter Sheehan and Sophia Videva.

Go Muskrats
Method 1: Aim Constraints
If you want to get to my preferred method, skip to Method 2. However, I thought I’d include the process here anyway. Aim constraints are the usual way to do an eye controller in Maya – if you Google “Maya eye controller tutorial” you’ll find lots of people recommending this method. Let’s see what happens when we do it in Motionbuilder!
Step 1: First thing to do is rig our eyes in Maya. Hide the head geometry (CTRL + h). Create a two-joint joint chain, with the base joint right in the center of the eye and the end joint on the surface of the eye. Skin the eyeball mesh to the center joint only:

hold down "v" to point-snap the joints. The base joint needs to be directly in the center of the eye -- you can also parent it to the eye with Maintain Offset turned "off". I named my joints l\_eye\_bind and l\_eye\_aim.
When you rotate the center joint, the eye should rotate with it. The end joint gives the center joint something to point towards. Make sure that the joint chain is pointing directly forwards. The default gaze of the eyes should also be forwards, although the end joint doesn’t necessarily have to be perfectly aligned with the center of the pupil, as it is in the case of Chad here.
You can use the Skeleton > Mirror Joints tool to mirror the joints that you made for the left eye to the right eye. Just make sure everything is aligned properly. Make sure you include your eye joints in your skeleton hierarchy, then select the mesh, the entire skeleton hierarchy and click File > Send to Motionbuilder. You can also export it as an FBX and open it in Motionbuilder.
Step 2: Now, we’ll set up our eye controller in Motionbuilder. Hit CTRL + A to display your model in X-Ray view, and expand the hierarchy in the Navigator to see your eye joints. We’ll first make our controls. If you’ve ever used a character rig, you’ll probably be used to NURBS curve eye controllers, like the one shown on my Eleven rig below:

NURBS eye controller
Unfortunately, there’s not an easy way to make nice controllers like this in Motionbuilder – there just isn’t as robust a NURBs modeling toolset as there is in Maya. So, we’ll just use cubes. Not as beautiful, but it’ll do. Open the Asset browser, and go to the Primitives tab.
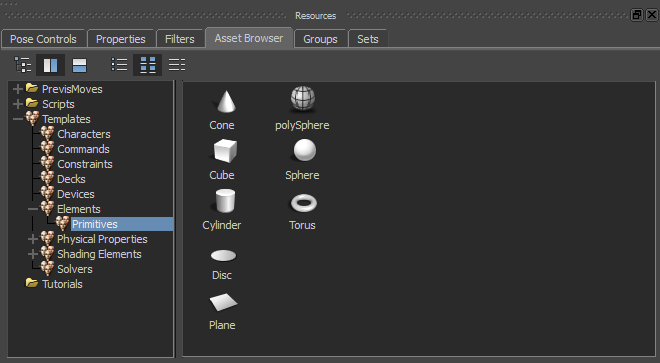
Drag a cube into the scene. Rename it something like “l_eye_CTRL”. Right click on it, and click “Zero > All”. This will zero out the transforms on the cube. Motionbuilder doesn’t have the option to Freeze Transformations, so we’ll have to manually move the pivot point in order to get our controller in place without affecting the local transforms.
Click on the l_eye_aim joint. Hit W to switch to the Transformation Tool, and change the mode to Global in the toolbar. Take note of the global transformation values.

A. Change transformation mode to global.
B. Global transformation values.
Next, click on the l_eye_CTRL (the cube) and in the Properties panel, select All (Type) from the drop down at the top. Go to Transformation Pivots > Rotation Pivot > Manual Offset > Rotation offset and enter the values from the l_eye_aim joint. So, for me, I’ll enter (3.80, 193.04, 17.59). The l_eye_CTRL will relocate to this position without affecting our local transforms.
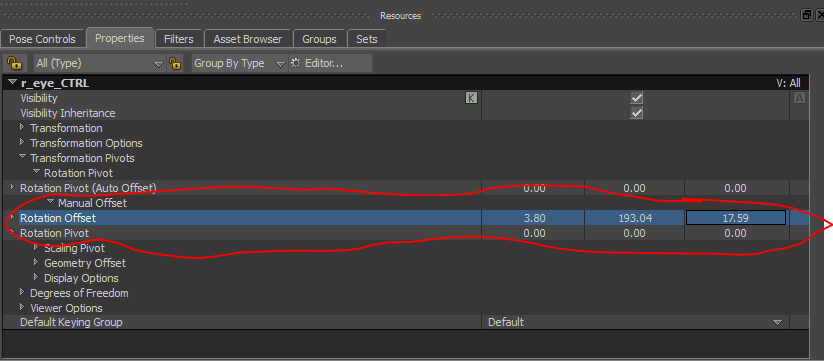
Use the Scale Tool to resize the control.

Back in the Properties Panel, adjust the Z offset so that the l_eye_CTRL is a reasonable distance from the eye:

Now, we’ll duplicate the controller twice. We’ll rename one of them r_eye_CTRL and one of them eye_parent_CTRL. In the Manual Offset of the r_eye_CTRL, we’ll negate the X value so that the controller is in front of the right eye. In the Manual Offset of the eye_grp_CTRL, we’ll zero out the X value so that the controller is in the middle of the two controllers:

I resized the eye\_grp\_CTRL.
Now, in the hierarchy, ctrl + click on the r_eye_CTRL and l_eye_CTRL and drag them on top of the eye_grp_CTRL. On the drop down that appears, select “Parent.” Now, if you move the eye_grp_CTRL, the other controls should also move.
The last thing is to set up a reference controller so that we can have the eye controls follow the head without changing the local transformation of the eye_grp_CTRL. Drag a Null from the Elements section of the Asset Browser on top of the eye_grp_CTRL. Rename it to ref_eye_CTRL and parent the eye_grp_CTRL underneath. My final setup looks like this:

Step 3: Finally, we’ll set up our constraints. In the Asset Browser, under Constraints, click and drag an Aim Constraint onto the l_eye_CTRL. Select “Set as Source Object” on the pop-up menu. Do the same on the r_eye_CTRL.
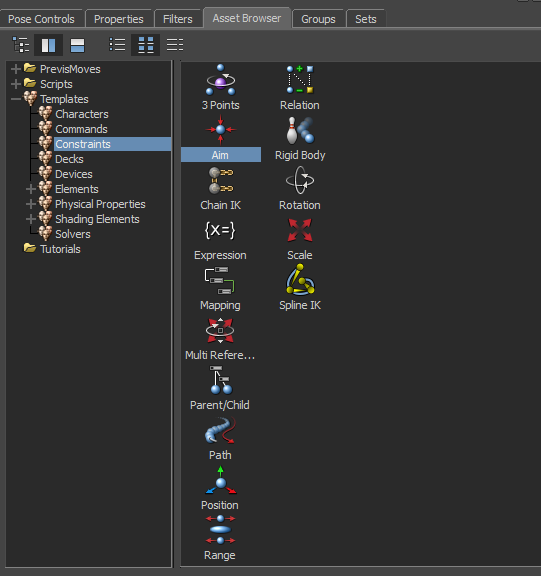
Rename the constraints in the hierarchy so that you can tell them apart. Double click on the constraint for the left eye in the hierarchy to view the constraint settings. Now, drag the l_eye_bind joint into the “Constrained Object” field in the Constraint Settings. Click “Snap” to maintain the offset and activate the constraint. Now, if you move the l_eye_CTRL, the left eye should stay pointed at it.

To drag the l\_eye\_bind joint into the Constrained Object field, select it in either the Viewport or the hierarchy and hold alt and drag, or x and drag, depending on your hotkey setup.
Finally, drag a Parent/Child constraint from the Asset Browser onto the ref_eye_CTRL null. This time, select “Constrain Object” from the pop-up menu, and drag the character’s head joint into the “Aim at Object 1” field in the Parent Constraint Settings. Snap. Now, when you rotate the head, the eye controls should follow.
The Problem
This setup works fine if your character isn’t doing any extreme movements (walking, sitting and talking, etc.) However, an issue emerges when the character’s head is looking up or down at a large angle. See what happens when I make Chad gaze at the stars:

It’s subtle – due to the size of Chad’s irises and the fact that the pupil is positioned at the eye_aim joint, it’s almost impossible to see in the Models-only view – but if you look at the joints, you can see that, despite not having moving the eye controllers, Chad’s left eye has rotated and is, technically, no longer tracking. Ack!

When we show the joints, it's easier to see that the left eye has rotated a bit.
If we animate with this controller, and Chad gets into a position where his face is pointed up or down (e.g. shotgunning a Natty #fratstar) one of the eyes will roll around in the socket, almost like a lazy eye. Not what we want.
To understand this problem, we need to know a little bit about how aim constraints work. I got this information from this article and this article in the Maya documentation. Basically, the way it works is that there is an aim vector that starts at the eye_bind joint pivot point and points in the direction that the eye is looking at (i.e. at the cube). Then, there is a user defined up vector that controls the orientation of the eye_bind joint around the aim vector. Here, we can see that Chad’s left eye has rotated around the aim vector. This happens because the up vector is constantly trying to align itself with the world up vector (usually the y axis). From the Maya documentation:
As the aim vector approaches pointing in the same direction or the opposite direction of the up vector, the constrained object rotates more rapidly about the aim vector. When the aim vector points in exactly the same direction, or in exactly the opposite direction, the constrained object can suddenly rotate by 180 degrees about the aim vector.
The source of the problem is that the eye’s aim constraint has an up vector that changes. You can avoid this problem by animating the aim constraint’s up vector in the Properties window – however, that’s a little hacky and doesn’t yield perfect results. The better way to do it is to make sure that the up vector never changes, which we can accomplish with a chain IK and pole vector object.
Method 3: Chain IK
Step 1: First thing to do is rig our eyes in Maya. Hide the head geometry (CTRL + h). Create a two-joint joint chain, with the base joint right in the center of the eye and the end joint out in front of the character this time, not in the center of the eye. This seems weird, but we do this because the IK effector can’t have an offset from the end of the chain IK in Motionbuilder, so if we want the controller to be in front of the face instead of directly on the eye, we have to move the joint forward.
Skin the eyeball mesh to the center joint only:
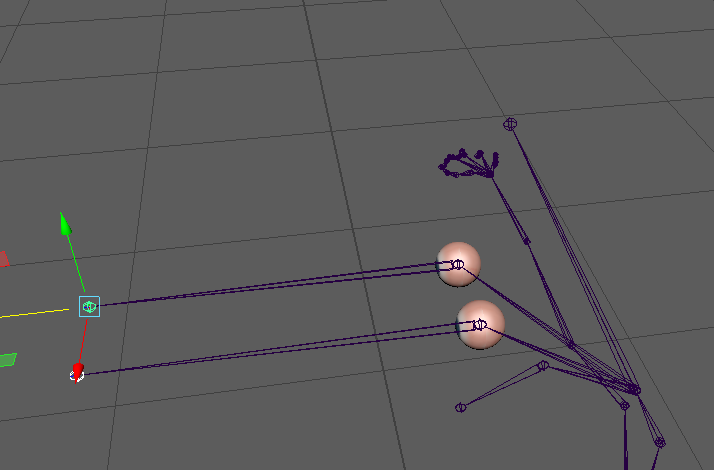
When you rotate the center joint, the eye should rotate with it. The end joint gives the center joint something to point towards. Make sure that the joint chain is pointing directly forwards. The default gaze of the eyes should also be forwards, although the end joint doesn’t necessarily have to be perfectly aligned with the center of the pupil.
You can use the Skeleton > Mirror Joints tool to mirror the joints that you made for the left eye to the right eye. Just make sure everything is aligned properly. Make sure you include your eye joints in your skeleton hierarchy, then select the mesh, the entire skeleton hierarchy and click File > Send to Motionbuilder. You can also export it as an FBX and open it in Motionbuilder.

Step 2: Now, we’ll set up our eye controller in Motionbuilder. This is almost exactly the same as the controller we set up in the aim constraint section.
Hit CTRL + A to display your model in X-Ray view, and expand the hierarchy in the Navigator to see your eye joints. We’ll first make our controls. If you’ve ever used a character rig, you’ll probably be used to NURBS curve eye controllers, like the one shown on my Eleven rig below:

NURBS eye controller
Unfortunately, there’s not an easy way to make nice controllers like this in Motionbuilder – there just isn’t as robust a NURBs modeling toolset as there is in Maya. So, we’ll just use cubes. Not as beautiful, but it’ll do. Open the Asset browser, and go to the Primitives tab.

Drag a cube into the scene. Rename it something like “l_eye_CTRL”. Right click on it, and click “Zero > All”. This will zero out the transforms on the cube. Motionbuilder doesn’t have the option to Freeze Transformations, so we’ll have to manually move the pivot point in order to get our controller in place without affecting the local transforms.
Click on the l_eye_aim joint. Hit W to switch to the Transformation Tool, and change the mode to Global in the toolbar. Take note of the global transformation values.

A. Change transformation mode to global.
B. Global transformation values.
Next, click on the l_eye_CTRL (the cube) and in the Properties panel, select All (Type) from the drop down at the top. Go to Transformation Pivots > Rotation Pivot > Manual Offset > Rotation offset and enter the values from the l_eye_aim joint. So, for me, I’ll enter (3.80, 193.04, 40.00). The l_eye_CTRL will relocate to this position without affecting our local transforms.
In the aim constraint section, we moved our eye_CTRL out in front of the face, but we’re not going to do that here, since the joint is already in front of the face. Resize the controller using the Scale Tool.

Now, we’ll duplicate the controller twice. We’ll rename one of them r_eye_CTRL and one of them eye_parent_CTRL. In the Manual Offset of the r_eye_CTRL, we’ll negate the X value so that the controller is aligned with the r_eye_aim. In the Manual Offset of the eye_grp_CTRL, we’ll zero out the X value so that the controller is in the middle of the two controllers:

I resized the eye\_grp\_CTRL.
Now, in the hierarchy, ctrl + click on the r_eye_CTRL and l_eye_CTRL and drag them on top of the eye_grp_CTRL. On the drop down that appears, select “Parent.” Now, if you move the eye_grp_CTRL, the other controls should also move.
Next, we’ll set up reference controller so that we can have the eye controls follow the head without changing the local transformation of the eye_grp_CTRL. Drag a Null from the Elements section of the Asset Browser on top of the eye_grp_CTRL. Rename it to ref_eye_CTRL and parent the eye_grp_CTRL underneath.

Finally, we’ll create two Nulls to serve as the pole vector objects for each eye. Drag and drop a Null on top of the l_eye_bind joint (the joint will turn green when the Null is on top of it). Rename the null “l_eye_PV_loc”. Repeat for the right eye. Translate both Nulls up so that they’re above the head. My final setup looks like this:

Step 3: Finally, we’ll set up our constraints. In the “Constraints” Section of the Asset Browser, drag a Chain IK into anywhere in the Viewport (you don’t have to drop it on an object):
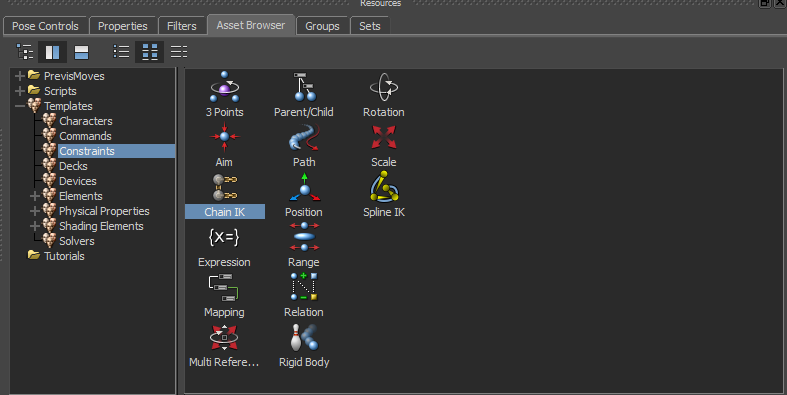
A Chain IK will appear in the “Constraints” section of your hierarchy. Rename it l_eye_IK and open the Constraint Settings. Drag your l_eye_bind joint into the “First Joint” field, your l_eye_aim joint into the “End Joint” field, your l_eye_CTRL into the “Effector” field, and your l_eye_PV_loc into the “Pole Vector Object 1” field:
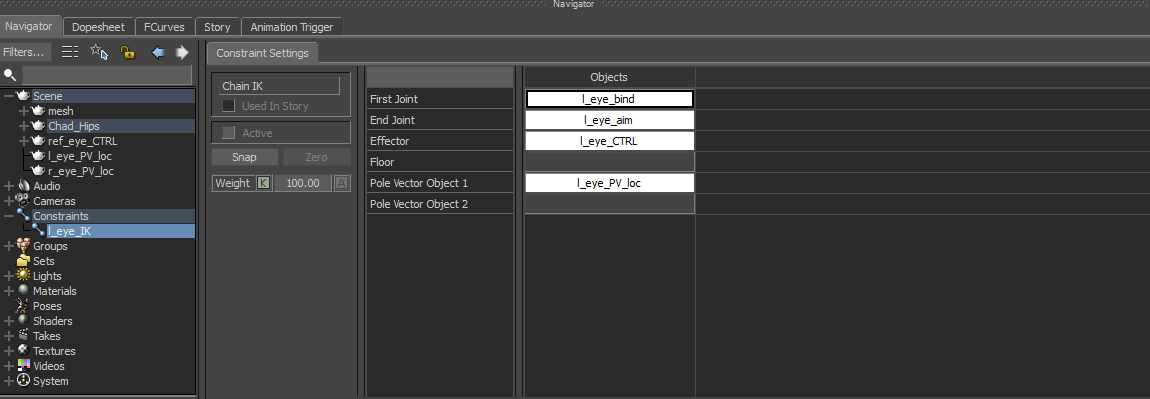
To drag the various objects into their respective fields, select the object in either the Viewport or the hierarchy and hold alt and drag, or x and drag, depending on your hotkey setup.
Click “Snap”. Now, when you move your l_eye_CTRL, your character should look at it:

Repeat this process for the right eye. Voila! You have eye tracking!

I can constrain the eye\_grp\_CTRL to something -- a marker, another character, etc. -- to make a Chad's gaze follow it.
Finally, we’ll put in some parent constraints. Drag a Parent/Child constraint from the Asset Browser onto the ref_eye_CTRL null and select “Constrain Object” from the pop-up menu. Drag the character’s head joint into the “Source Object” field and click “Snap” to activate the constraint. Do the same with the eye_PV_loc nulls to constrain the Pole Vector objects to the head as well. Now, if you move the character’s head, the eye_PV_loc nulls and the eye controls should maintain their position.
You’ll also notice that there’s no lazy eye when we look straight up or down, due to the fact that the pole vector of the IK handle doesn’t change, preventing rotation. Mission accomplished!

Thanks for reading! I hope this was helpful. I definitely spent a lot of time banging my head against the wall with the aim constraint before I figured out the IK thing, so hopefully this saves you some time.
UPDATE: I wanted to include that sometimes the eye_bind_joint will rotate 90 degrees on it’s own. To fix this, you can just uncheck “Active” in the constraint settings on the Chain IK, rotate the eye_bind_joint back to the proper position (0,0,0) and recheck “Active” (not “Snap”, this will maintain the offset, which is not what you want).