Using MotionBuilder Voice Device
11 Jun 2019
UPDATE: In section 1 of this post, we paint the blendshape weights for the character. I’ve noticed a bug where sometimes, all your morph targets don’t appear in the “Target” section of the Paint Blend Shape Weights Tool. You can get around thing by right-clicking on your base mesh, and while holding down the right mouse button, move down to Paint > Blend Shape > your desired shape.
UPDATE, THE SEQUEL: I recently discovered that Maya’s fbx exporter doesn’t export shape masks (also know as blend shape weighting). If you made multiple shapes on one model and masked some of them out, this isn’t going to work in MoBu – the entire mesh is going to be effected. If you make this mistake and don’t want to make new targets, you can turn up the original shape (with the mask on the target) up to 1.00, all of the others down, select the base mesh, and in the Shape Editor, do Create > Target from Selection. Then, you’ll have a target with only the desired deformation. See me discover this on the Autodesk forums.
Hey everybody! For my first post, I wanted to share one of my absolute favorite things, which is doing automated lip syncing using Autodesk Maya and Autodesk Motionbuilder (both of which are available for free through Autodesk if you’re a student). This is a super powerful method to quickly get lots of talking animation if you are a little familiar with MoBu and pretty familiar with Maya. I’ll do my best to describe what a particular tool or asset does, but sometimes I’m going to refer to Maya/MoBu documentation for more in-depth information. The point of this tutorial is to give an explanation of how the different assets and tools come together, not to parrot the manual by giving exhaustive detail about a particular technique
For this tutorial, I’m using Keith, which is the main character in a short film I created with Joseph Horowitz and Hannah Kim, also both art students at Carnegie Mellon.
STEP 1: Once you have your model completely done (plus transformations frozen and edit history deleted) you’re going to want to make a morph target for each phoneme. Motionbuilder’s Voice Device (which I’ll discuss later) has the following phonemes options:
AE, AO, AX, B, Breath, D, Default, F, FV, G, H, IY, K, KG, L, M, N, OW, P, PB, S, SH, Silence, SZ, SZH, T, TD, UH, UW, V, Z, ZH.
However, having morph targets for all these phonemes is overkill. It’s up to you to decide how many you need, but for a standard phoneme set, I’d use:
AE (as in “fat”), AO (as in “bought), AX (as in “skate”), FV, G, IY (as in “meet”), KG, L (if your character has a tongue), M, OW (as in “pow”), PB, S, SZH (like the “j” in “jaundice”), TD, UH (as in “duh), UW (as in “screw”).
Create a copy of your head geometry for each phoneme. Use the sculpting tools to sculpt the mouths into each individual phoneme.
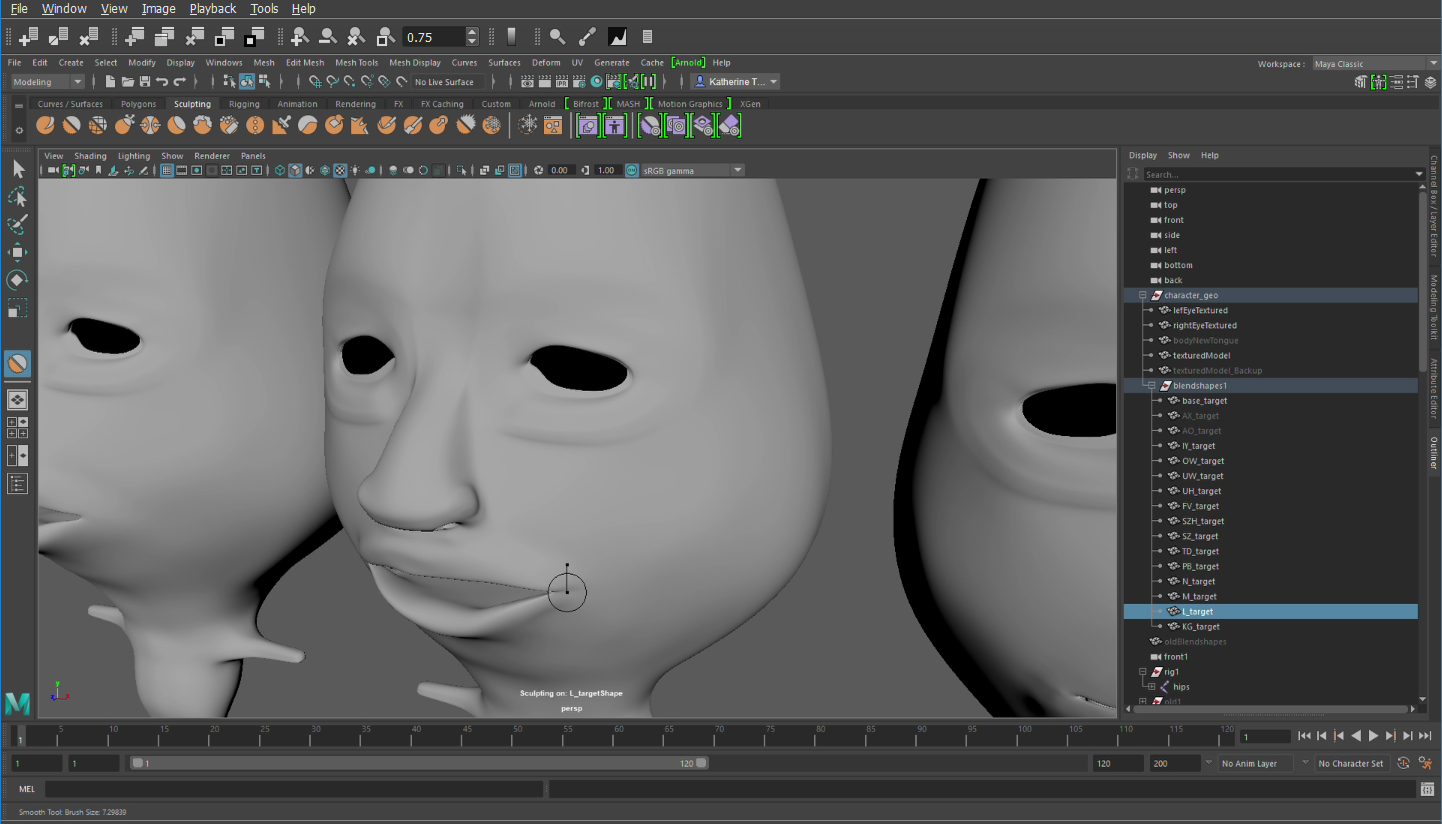
Step 2: Once you have phoneme morph targets, select all of the morph targets, then select the character head geometry, and click Deform > Blend Shape.
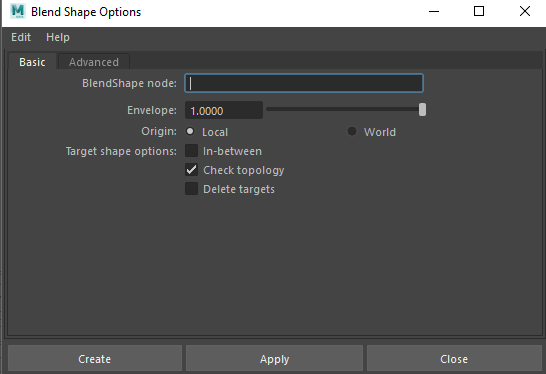
Checking Local will make it such that the head does not move towards the morph target when the weight is increased. You can delete the targets later since the information is now on the head, but I like to keep them around in case I need to redo something.
Check your targets by into Window > Animation Editors > Shape Editor, which I believe is new in Maya 2017, or by looking clicking on the blendshape node in the “inputs” section of the Channel Box.
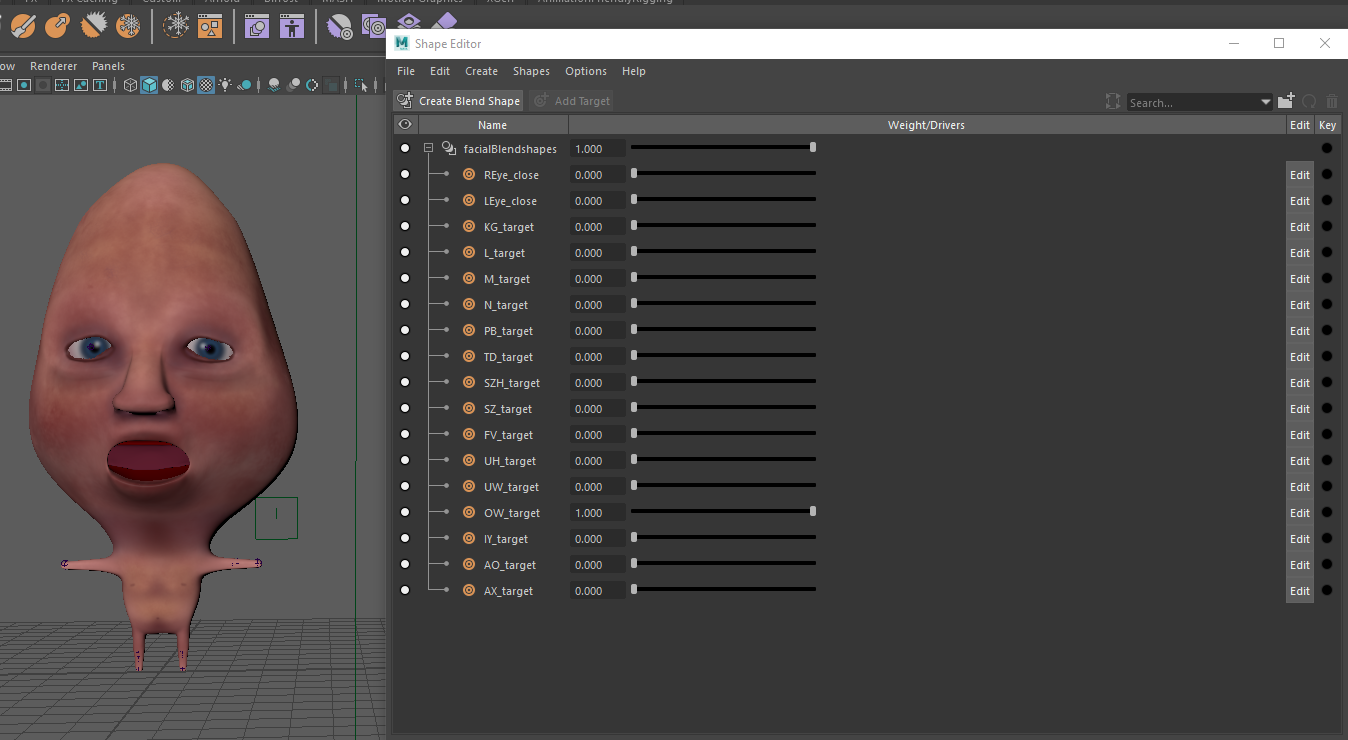
You want all the morph targets for a particular model to be under one blendshape so that you can paint the weights. Check that all your deformers are working properly by dragging the sliders
You’ll notice that I also have blend shapes for the eyes to close. For any piece of geometry, you want to only have one actual blend shape, with multiple morph targets. This is kind of confusing, because often “blend shape” gets used as a stand in for “morph target.” If you need to add targets, instead of making a new blend shape, select the new morph target, then click on the blend shape in the Shape Editor, and click Create > Add Selection as Target.
| Next, we’re going to paint the blendshape weight so that multiple blend shapes will be affecting the model at different times. Click on the head geometry, and go to Deform > Paint Weights | Blend Shape, and open the Tool Settings with the little box. |
Update: You don’t need to paint the blendshape weights because Maya doesn’t export the shape masks. This isn’t a big deal because Motionbuilder will combine blendshapes, so one deformation won’t override another. However, you can’t make multiple targets on the same model and then mask them out to make several unique targets – you need a unique piece of geometry for each target. See the updates at the top for more information. But I’m leaving this section about painting shape weights in for your educational purposes.
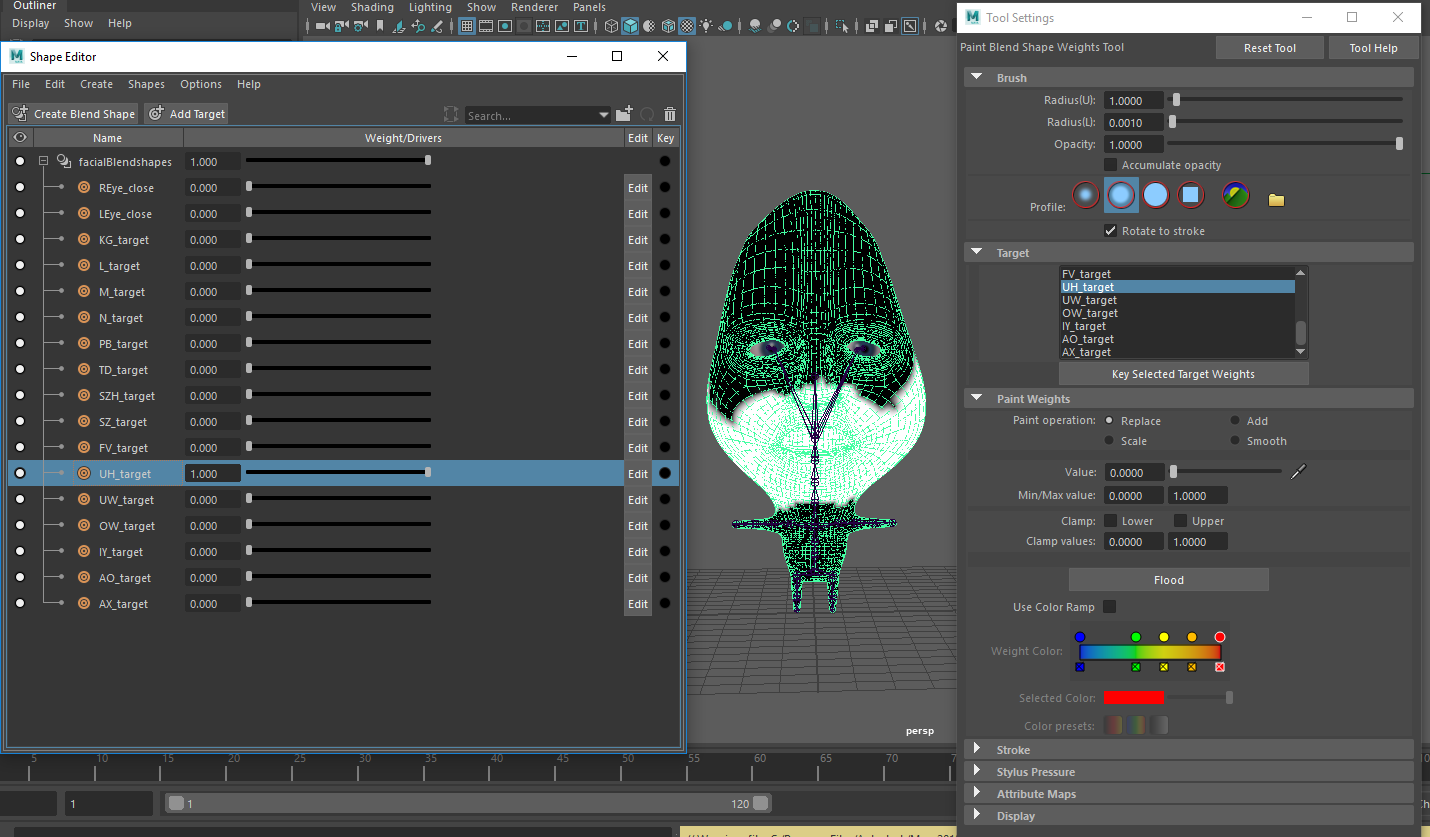
If you’ve ever painted skin weights, this tool is very similar. You can select the different morph targets and paint in areas of influence. This allows you to have multiple targets affecting a piece of geometry at the same time (for example, you can hit the AO phoneme and a blink at the same time). If you don’t paint weights, a single target will control the whole geometry, and you’d need an exponentially increasing number of targets for each possible facial position! Further documentation of this tool can be found in the Maya Manual.
Once you’re done with the blend shapes, you can finish the rest of your rig. Blend shapes should be done before skinning.
One thing to note: it’s totally possible to use the Voice Device with a rig setup using a joint-based facial rig (popular for games because it’s lighter than blendshapes)! I’ll talk about that at the end of this post.
Step 3: Now, we’re going to save the file and hop over into MoBu. If you have the same year of Maya and MoBu, you should be able to use the File > Send to Motionbuilder option. If not, you can export your rig as an FBX and open it in MoBu. Make sure to include blend shapes in your FBX export options.
You might notice that your model’s face looks broken. If it seems like one of the blendshapes has been extended like 500% (like the mouth is open SUPER wide), don’t worry about it. This seems to be an import bug. We’ll fix it in the next step, and it’s caused me no issues (other than heart palpitations the first time I saw it).
At this point, I retargeted body motion capture to the Keith model, but you don’t necessarily need to do that.
Once you’re ready to start your facial animation, go to the Asset Browser and select Templates > Devices. Click and drag the Device called “Voice” onto your character. A Voice Device should appear in the Navigator. (note: if you’re double clicking on the assets but nothing is appearing to the right, make sure the navigator is unlocked)
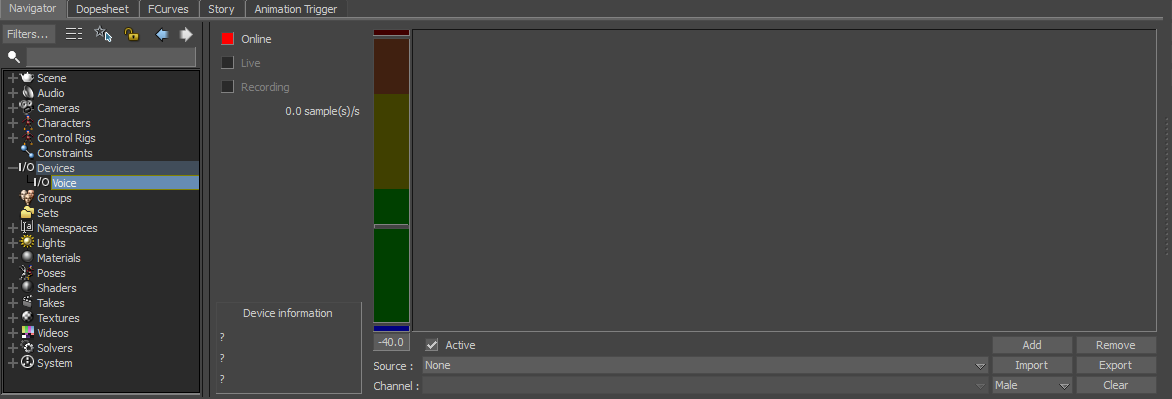
Our newborn voice device
A Voice Device essentially identifies phonemes in pre-recorded or audio coming into the mic. and allows you to map them to the phoneme shapes you just created by way of the Character Face (which I’ll talk about later). It really helps if you have a nice recording – no peaking, no background noise, no music, etc. because MoBu can’t tell inherently what is a phoneme and will try to map background noise to a phoneme. I’ll talk about strategies to mitigate this problem later, but set yourself up for success with a good recording. I’m not going to go into exhaustive details of the buttons because the MoBu documentation has a better description than I could provide.
Anyway, you should click the “Add” button, which will pull up a list of phonemes that the Voice Device can identify. CTRL + select every phoneme that you made a morph target for. Hit Ok. Next, under “Source”, select “New Media” and load your audio clip (or select your microphone). Finally, check the “Online” box so it turns yellow instead of red. Now, when hit play on the Transport Controls (known to the laity as “the Timeline”) you should be able to see Mobu identifying the different phonemes:
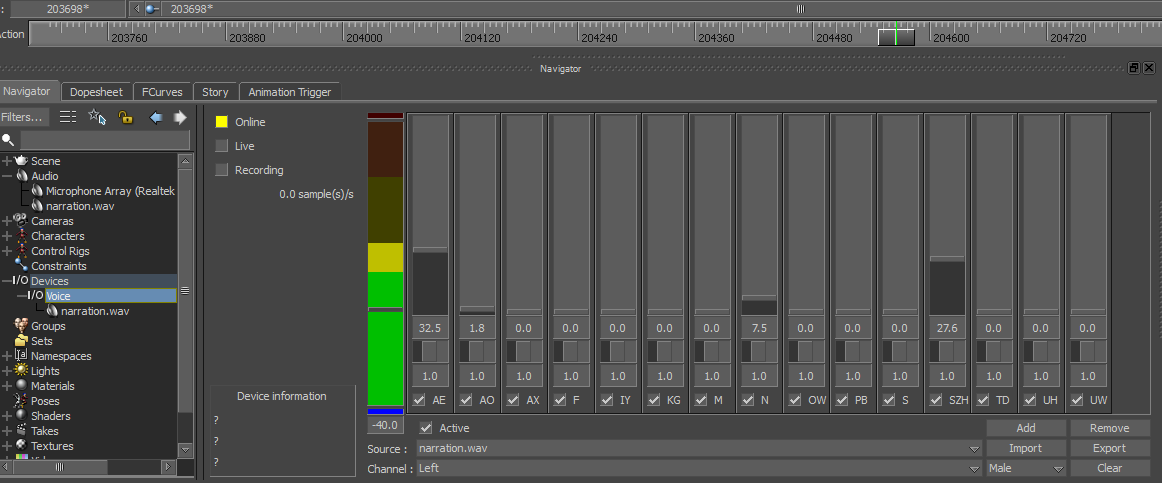
phoneme identification
If you see the phonemes but don’t hear the audio, check you computer’s audio settings and MoBu’s audio preferences. If you still can’t hear it, select your clip in the navigator and make sure that it’s directing to the right speakers, has the proper offset to match your timeline, and is set to the current Take.
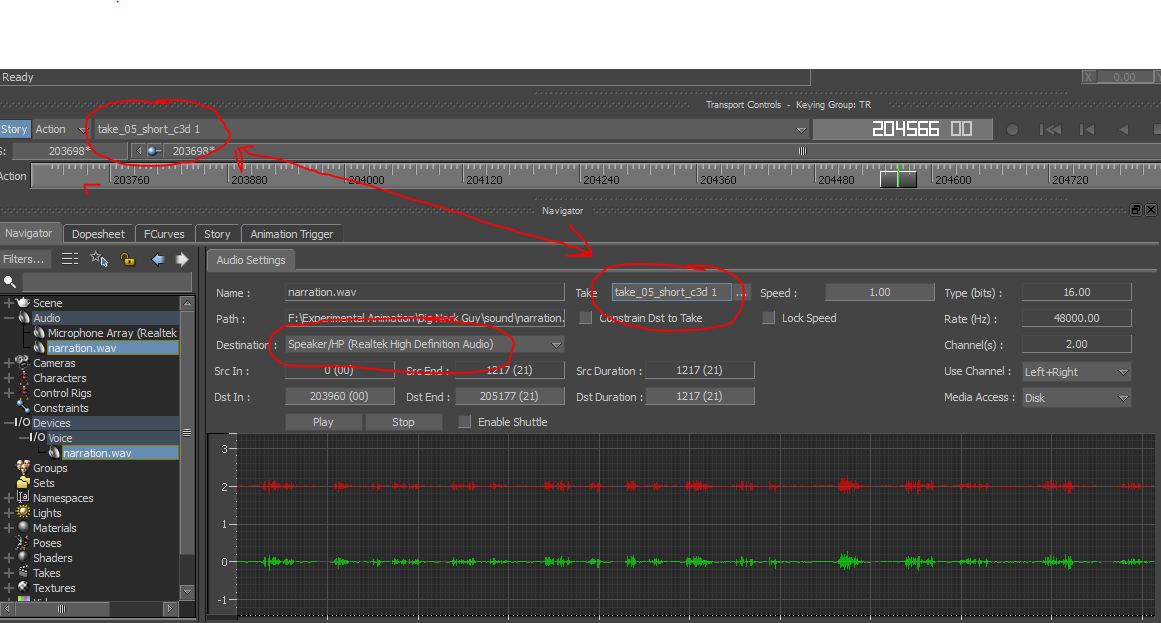
Troubleshooting no sound.
Step 4: Now that our Voice Device is set up, it’s time to set up our character, which means mapping the morph targets on our facial blendshape to MoBu’s phoneme blend shapes. (As you do more motion capture and game animation, you’ll begin to see just how much mapping goes on).
Shift+select every piece of geometry involved in facial animation (so if your teeth, tongue, eyelashes are separate pieces of geometry, select then along with the head geometry), then go to the Asset Browser and under Characters, drag a Character Face onto your model. On the pop-up menu, select “Attach to Model.” In the Navigator, double click on the Character Face to view the Character Face Definition pane. You should see something like this:

The Character Face Definition pane
The Character Face is a very important asset for facial animation in Motionbuilder – it’s what allows you to transfer input data, whether that’s facial mocap or phonemes from a Voice Device, onto a model. If you’ve never used it, I recommend you read about it on the Motionbuilder documentation.
If you have the broken face problem I talked about earlier, go to the Generic Tab and click on any expression. You should see the model’s face snap into rest pose.
If you’ve set up your Voice Device, you should see every phoneme that you added under the Custom expressions tab. On the right side, under “Shapes mapping” we should see the various morph targets we added to our blendshape. If you don’t see these, check to make sure that your blendshape is properly applied.
Click on each phoneme in the Custom expressions tab, then dial the morph target up to 100% to define that expression. The model should go into that particular phoneme. It’s easier to watch me do this than to explain it:
Once you’re done, click through your Custom Expressions to make sure that everything is mapped properly. If you have other blendshapes, such as blinking, you can map them in the “Generic” tab, or define a custom expression for them. If your tongue and teeth are separate geometry, select those in the “Model with Shapes” drop down and repeat the definition. Consult the Character Face documentation if this is confusing.
You should also attach an Actor Face from the Characters section of the Asset Browser to your model. We’ll use this later.
Step 5: We’re almost ready to see our model move! The last step is to use the Relations pane to connect the phonemes identified by the Voice Device to the phoneme Expressions in the Character Face. Undock and fullscreen your Navigator pane (the Motionbuilder Relations Pane is a poor man’s Maya Node Editor, so you want as much real estate as possible.) Connect each phonemes from the Voice Device node to the empty connection in the shape Multiply node, as shown below:
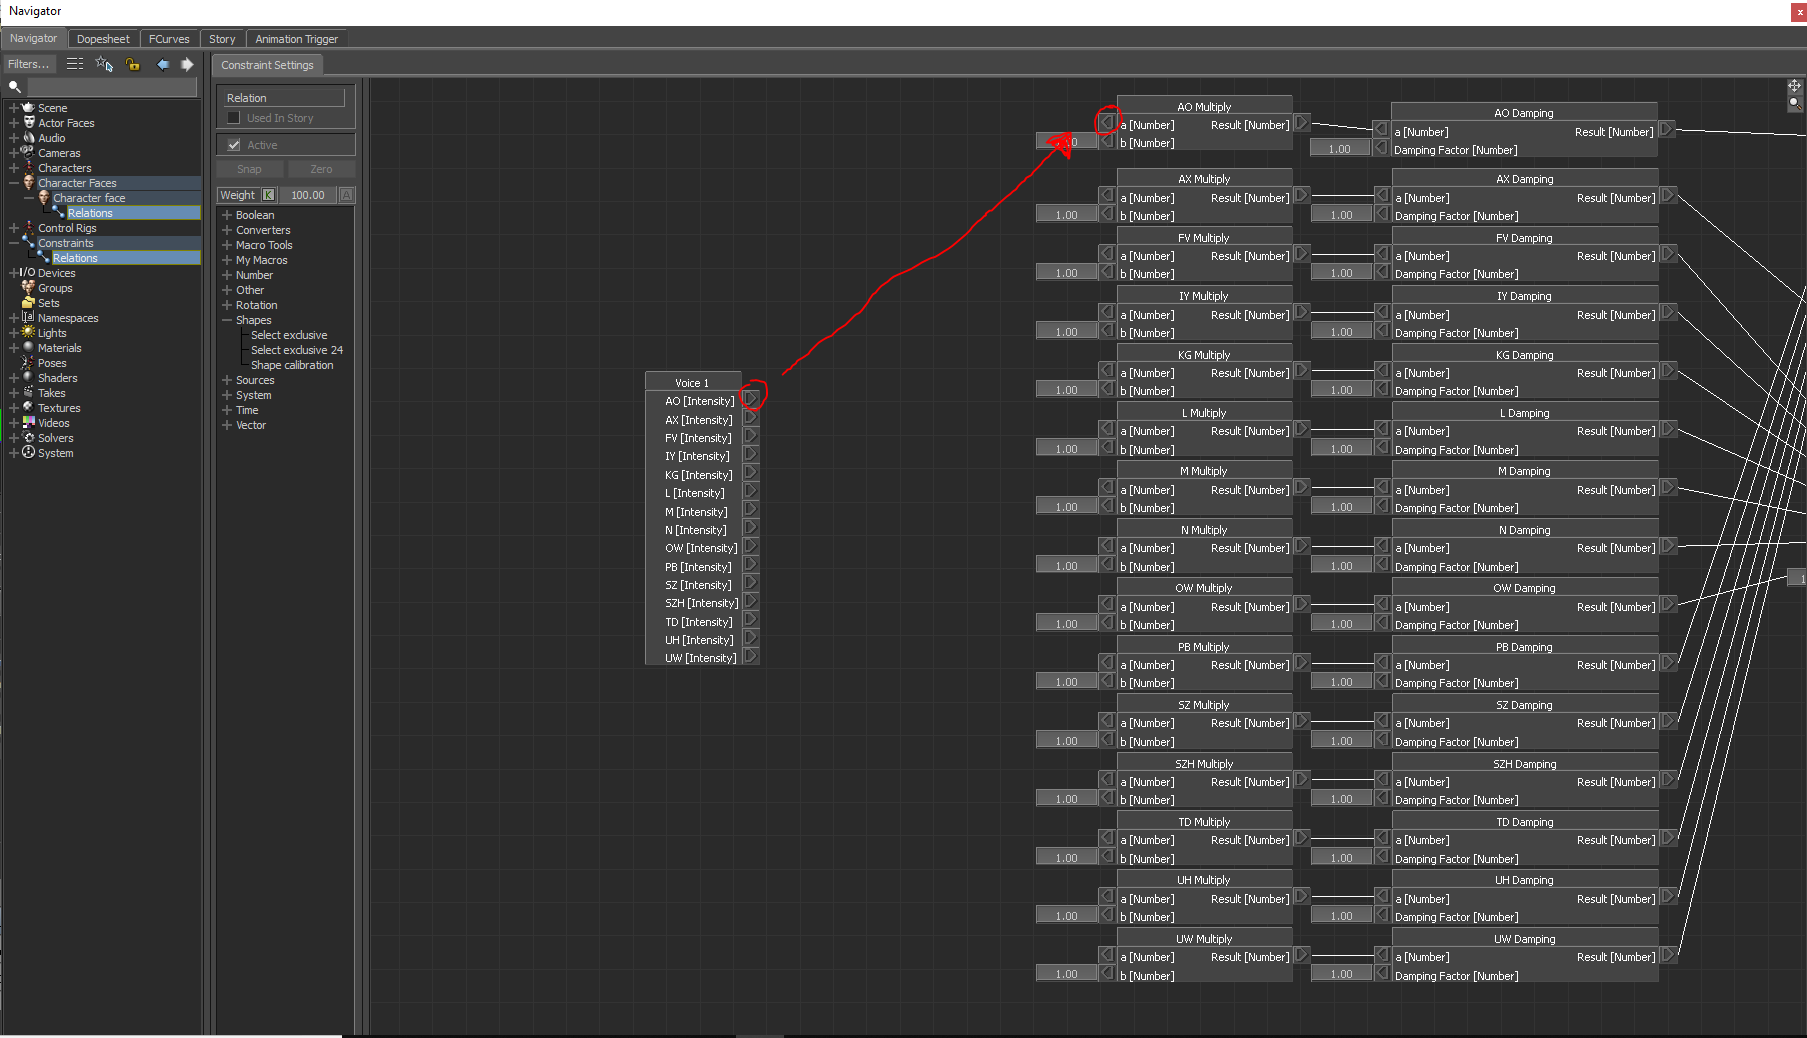
Your final result should look like this:
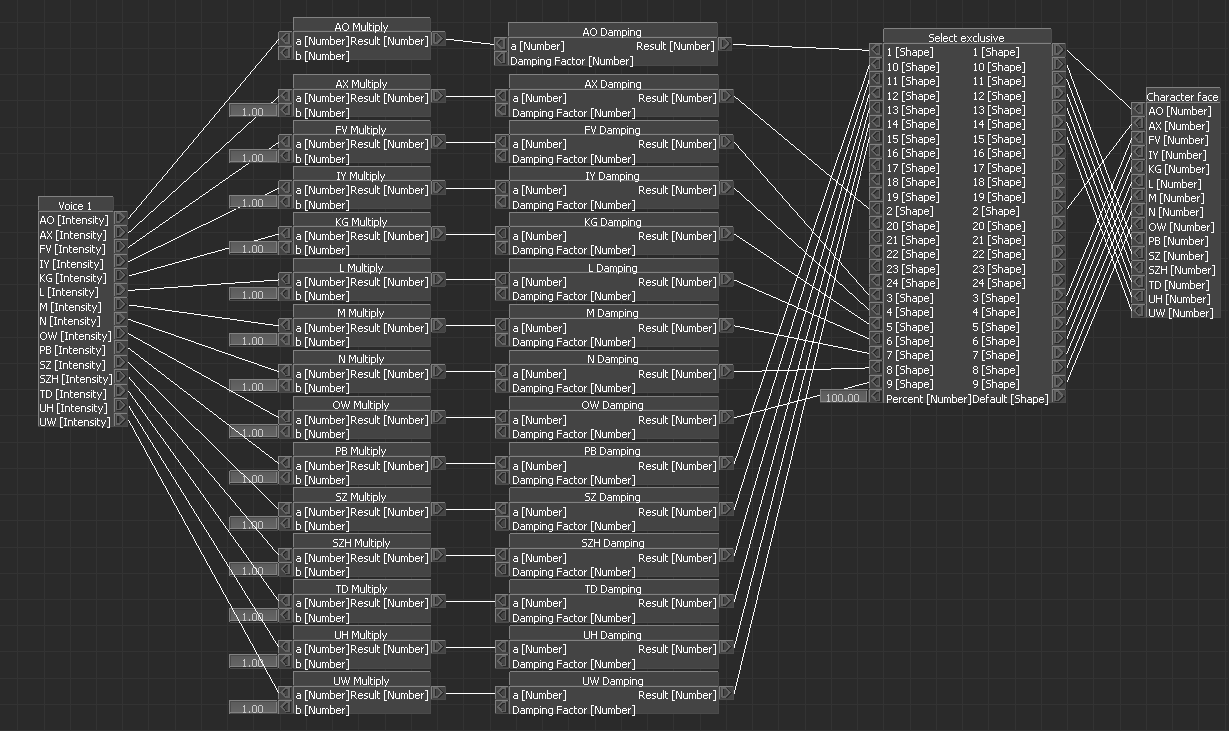
Hit play on the Transport Controls. You should see your model lip sync to the narration. If you don’t see anything, make sure the “Active” box on your Character Face is ticked, and the “Online” box in your Voice Device is yellow.

Step 6: Now it’s time to do some tweaking.
The first thing you should do is adjust the Voice Device threshold so that it discards bacgkround noise. If you don’t do this, MotionBuilder will try to map background noise, mouth clicks, and any sort of microphone static to a phoneme, causing your character to have lip jitter. Slide the threshold up until only the actual words are loud enough for Motionbuilder to pay attention too.
I’ve set my threshold to -37.2. On the left, the audio is louder than the threshold, so it triggers the model to move its mouth into the phoneme. On the right, while there’s still some audio, it’s lower than the threshold, so there’s no animation.
The next step is to adjust per-phoneme filtering and weighting. Filtering refers to the smoothness of the transition into a phoneme, and weighting refers to the emphasis the model places on a particular phoneme. Filtering and weighting work together to make sure the mouth movement is neither too mushy nor too abrupt. You can find more information on filtering and weighting can be found in the MoBu documentation.
Let’s start with filtering. Adjusting the sliders underneath each phoneme parameter adjusts the filtering. A slider all the way to the left has no filtering – the transition will be abrupt and jerky. A slider all the way to the right has maximum filtering – the transition will be very smooth. In general, you should have lowering filters on your consonants, particularly the close-mouth consonants M, P, B, F, V, and lowering filtering on your vowels so that you’re character doesn’t look like Pac-Man. In the image below, there will be very high filtering on AX and very low filtering on AO.

Next, we’ll adjust our phoneme weighting. To do this, we enter a value between 0 and 10 in the field below the filtering slider. The higher the value, the more emphasis on a particular phoneme. In the image below, there will be lots of emphasis on AO, and so little emphasis on AX that the model doesn’t even pronounce it.

If you want to dampen or accentuate every phoneme, you can do that in the Relations pane. Add an integer node, and then right click on the left arrow and select “Set Value.” Type your factor into the field (somewhere between 1 and 25 is usually good)
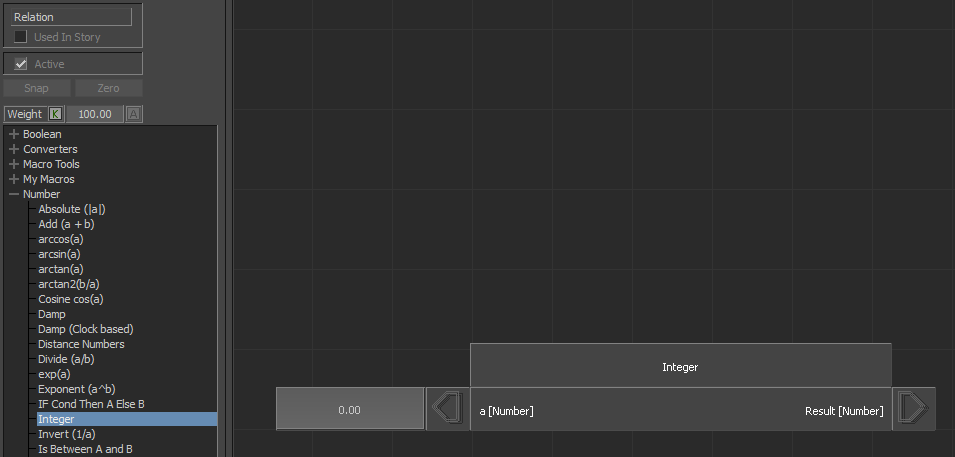
An integer node. Side note: if you need to zoom in in the Relations pane, left click+drag on the magnifying glass in the upper right corner. Again: poor man's Node Editor.
If you’re adjusting the dampening (below left), click on the dampening factor in every phoneme dampening node, then repeatedly single-click on the Result field in the Integer node. If you’re adjusting the multiply (below right), do the same with the multiply node instead of the dampening node.

If the clicks are confusing, you can watch me do it here: [https://vimeo.com/319511325](https://vimeo.com/319511325)
Step 7: You probably want to add other facial animation aside from just the lip sync. For Keith, I wanted to add blinking. To add animation on top of the lip sync, we use the Actor Face asset that we added to our model back in Step 4. The Actor Face is an animation source that drives the Character Face – you can have many Actor Faces in a scene, and choose which one drives your Character Face. So, you do any keyframe facial animation on the Actor Face, and that drives the expressions defined in the Character Face. The Actor Face is also the tool use to retarget facial mocap. We aren’t really using that many features of the Actor Face, but if you have never used it before, check out (you guessed it) the MoBu documentation.
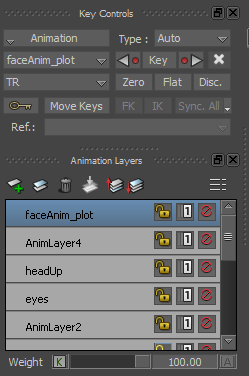
Make a new animation layer by clicking the plus button in the upper right
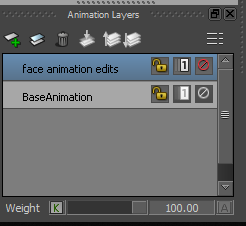
Open the Actor Face and locate the channel you wish to edit. Enable animation on the channel by clicking on the A button right of the channel (it should flip from grey to white). Create keyframes by clicking the K button left of the channel (it should turn red).

I'm closing Keith's left eye
One annoying thing about animating with the Actor Face is that the keys do not appear on the timeline. If you wish to see all your keys laid out, use the FCurves window.
Step 8: Once you’re totally happy with your facial animation, it’s time to plot it to the Character Face and export for Maya/3ds Max/game engine/whatever.
What we need to do is record the facial animation and mocap into a new Take. The first thing you need to do is make a new Take. To do this, click on the drop down Arrow in the Take list and select Take 02 (New Take):

Select Yes when MoBu asks you if you want to copy data into the new Take. This is so that your body mocap will carry over into the new Take.
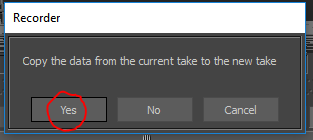
Rename your new Take in the hierarchy.

Tick the “Recording” box in the Voice Device and the record button on the Transport Controls. This allows you to record the data from the Voice Device into the Take.

Hit Play. Once the Take has played all the way through (this is how you record the Voice Device animation to the Character Face), untick “Live” in the Voice Device. Next, create a new layer on which to plot the face animation.
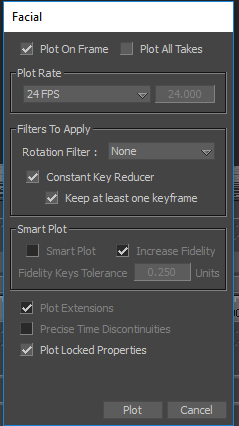
In the Character Face, select “Plot Animation…”. The following pop-up menu will appear. Selecting Plot on Frame makes sure that there aren’t keyframes plotted on fractions of frames. You can pick whatever frame rate you want (I use 24 if the final product is an animation and 60 if the final product is a game). Hit Plot. If you have body mocap, make sure that you plot that too. Read more about plotting here.
Now, you should be able to untick “Active” in your Character Face and still see the facial animation on your character in the Viewport. You should also see red keyframes in the on the shape channels in your Character Face. Finally, select your model, skeleton, and props in the Scene section of your Hierarchy (if you want to select all of the underlying elements, right click > Select Branches). Select File > Send to Maya, or save it as an FBX and import it into Maya.
Final things:
When you import your character into Maya, you should see the blendshape working automatically, with keys in morph target channels in the Shape Editor. You should also see a keyframe on every single bone if you used body mocap.
If your final destination is a game engine, you’ll need to bake the blendshapes in Maya to your character using Edit > Keys > Bake Simulation, and tick “Shapes.”
One final tip: when I’m assembling my final product (whether that’s in an NLE like Premiere Pro, After Effects, etc. or in a game engine), I like to add a small amount of delay to my audio. Viewers are much more likely to pick up on lip sync errors if mouth movements are too late than if they are too early – in fact, sometimes mouth movements that are timed exactly perfectly can look too late, so I’ll push my audio track back a few frames so any inconsistencies are minimized.
Thanks for reading! I hope this post was helpful! If you’d like to watch the final animation that I worked on with this tutorial, you can watch it here.